![]()
![]() I’ve started to use the excellent iPhone app Next to keep track of my expenses. My bank has a utility that automatically tracks every purchase I make, but for me, being a notorious money spender, it’s kind of a therapeutic thing to be forced every time I buy something to actually acknowledge the expense and not just buying without thinking. It’s also a great way of keeping track of what kind of things I spend my money on.
I’ve started to use the excellent iPhone app Next to keep track of my expenses. My bank has a utility that automatically tracks every purchase I make, but for me, being a notorious money spender, it’s kind of a therapeutic thing to be forced every time I buy something to actually acknowledge the expense and not just buying without thinking. It’s also a great way of keeping track of what kind of things I spend my money on.
There’s even an accompanying iPad and Mac application which syncs via iCloud between them automatically.
The interface is customized for each platform, the iPhone for quick entries whereas the iPad and the Mac app are more concentrated on displaying the statistics of your purchases.
The iPhone app consists of three different screens. The main quick entry screen, the statistics screen and the entry listings page.
(All the entries are in Swedish Kronor. I’m not that crazy spender!)
Entry Screen iPhone
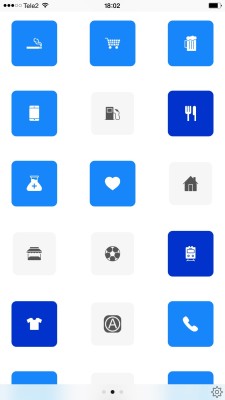
The quick entry screen consists of a number of configurable icons, each representing the type of expense it is. It’s easy to change the icons and rearrange the order by which they are displayed. Icons change the hue of blue depending on how much you spend in each category, so the more you’ve spent the darker the icon becomes. This makes it really easy to get a quick glance on where you spend the most money. When an icon is pressed, a number pad comes up allowing you to enter the sum of the purchase, and you can optionally add text to the entry.
To get an overview of your expenses, just swipe to the Statistics page.
Statistics
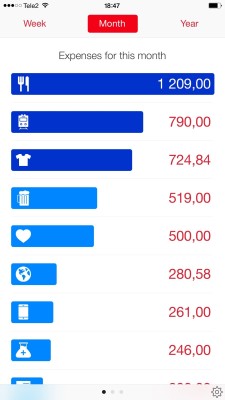 on this page you can get an overview of expenses by week, month or years.
Entries list view
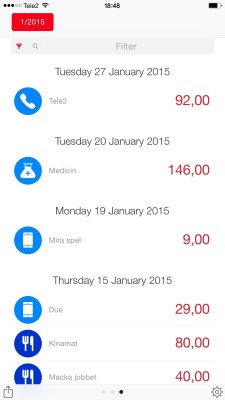 Here you can see each individual entry you made in date order, where you can edit or delete entries. Just tap on an entry to edit or swipe left to delete.
Next App URL scheme
In the latest upgrade of the app, it now supports URL schemes, so it’s now easy to call the app from other workflow-enhancing applications like Launch Center Pro where you can set up even quicker entries for stuff you buy often.
The URL scheme works like this:
next://add?category=5&amount=4.99¬e=BeerThe category value is by the order of the icons starting with 0 at top left and continues to the right line by line.
The note parameter is optional.
This is great if you want to set up predefined purchases you do often. There’s even support for x-callback, so it automatically returns to the calling app after the entry is registered. So below is an URL call for Launch Center Pro, adding an entry for a beer for $5 in the fifth category and then returns.
next://x-callback-url/add?x-success=launch://&category=5&amount=5¬e=Beer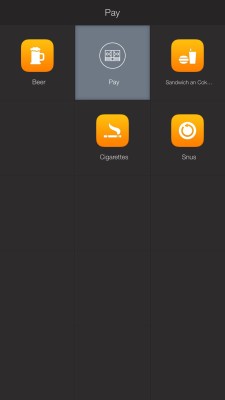
You can read more about the URL Scheme for Next App here.
I really like this app and really recommend it.
Leave a Reply