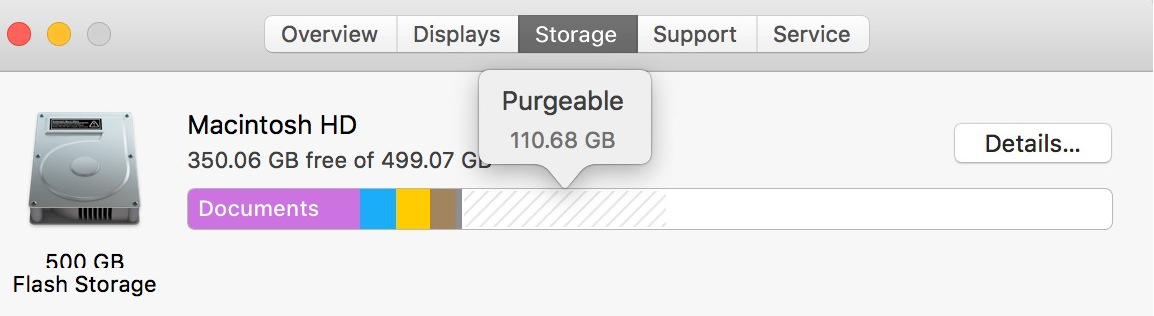
Can’t Remove Purgeable Disk Space
Note: If you have MacOS High Sierra installed, you need this guide instead.
When trying to install Bootcamp on my MacBook Pro, I had to delete a lot of files to get enough space to be able to accommodate for a Bootcamp partition on the drive. But even after removing around 60 GB of storage, MacOS Sierra could still not make a large enough partition for Windows. When checking with Disk Utility, it showed that indeed I had enough space, but there was a part called Purgeable that was impossible to move. No tools from Apple are available to handle this, but here’s how I fixed it.
(not actually my disk, forgot to take a screenshot)
Optimize Disk Storage
Apple added a feature called “Optimize Disk Storage” in MacOS Sierra. The idea is quite good. This feature isn’t well-implemented, though. If you have it enabled in System Preferences under iCloud/iCloud Drive settings (which I think is on by default), you essentially have two different values of how much disk space you have available. One “real,” that shows exactly how much there is, and then you have the Purgeable part, that includes software that can be uninstalled on the fly and later restored if enough space is available.
My problem was that MacOS Sierra refused to remove the Purgeable part of the partition, so when I tried to install Bootcamp, It only showed the “real” free disk space. The issue is, I manually deleted stuff like iMovie and GarageBand with the associated files by hand using OmniDiskSweeper, which is a free and excellent application for finding and removing large unused files on your disk. But for some reason, MacOS Sierra refused to recognize that I had the free disk space. After searching the net, I couldn’t find a good solution. But after a quick hack, I’ve created an easy way of forcing MacOS to remove the “Purgeable” disk space.
How to remove Purgeable Disk Space
First, I created a 20 GB file using the Terminal application. It’s easy enough thanks to MacOS Unix underpinnings. Open the Terminal app, found in the Utility folder in Applications. Don’t let the sparse interface scare you; this thing has superpowers!
Enter the following:
dd if=/dev/zero of=~/stupidfile.crap bs=20m
The command creates a file named stupidfile.crap using a device available on Unix/Linux, called /dev/zero which sends zeros which we use to create a large file.
You could do a periodic “Get Info” in the Finder to check on how large the file is. Another is to install Brew and use it to install the great tool watch by entering the command
brew install watch
If you do, open a new Terminal window and enter:
watch ls -alh ~/stupidfile.crap
Now we can see how large the file is. When the data is about 10-20GB in size, press ctrl-c in the first window to stop creating a file. You can now quit the Terminal application.
Large file, let’s fill the disk!
So now we have a large file. No need to use the /dev/random function to make a larger file, because it’s faster to duplicate the stupidfile.crap we just created. So go to your home directory, select the file stupidfile.crap and press cmd-d to duplicate the file. Just keep making several duplicates at the same time to speed things up. Now we will make a lot of copies of the file in your home directory. What we are aiming for, is to fill the disk, so the OS starts purging (hence, eating into the “Purgeable” part.)
Sooner or later you’re going to hit the magic wall, and you’ll get messages that the disk is full. Wait a while and see if it has removed parts of the Purgeable section using /Applications/Utilities/Disk Utility. If the system allocates more free space, keep duplicating our dummy file to fill up the disk. Sooner or later, you will have a full disk with either a very small or nonexistent “Purgeable” section on it.
Time To Turn Off “Optimize Mac Storage”
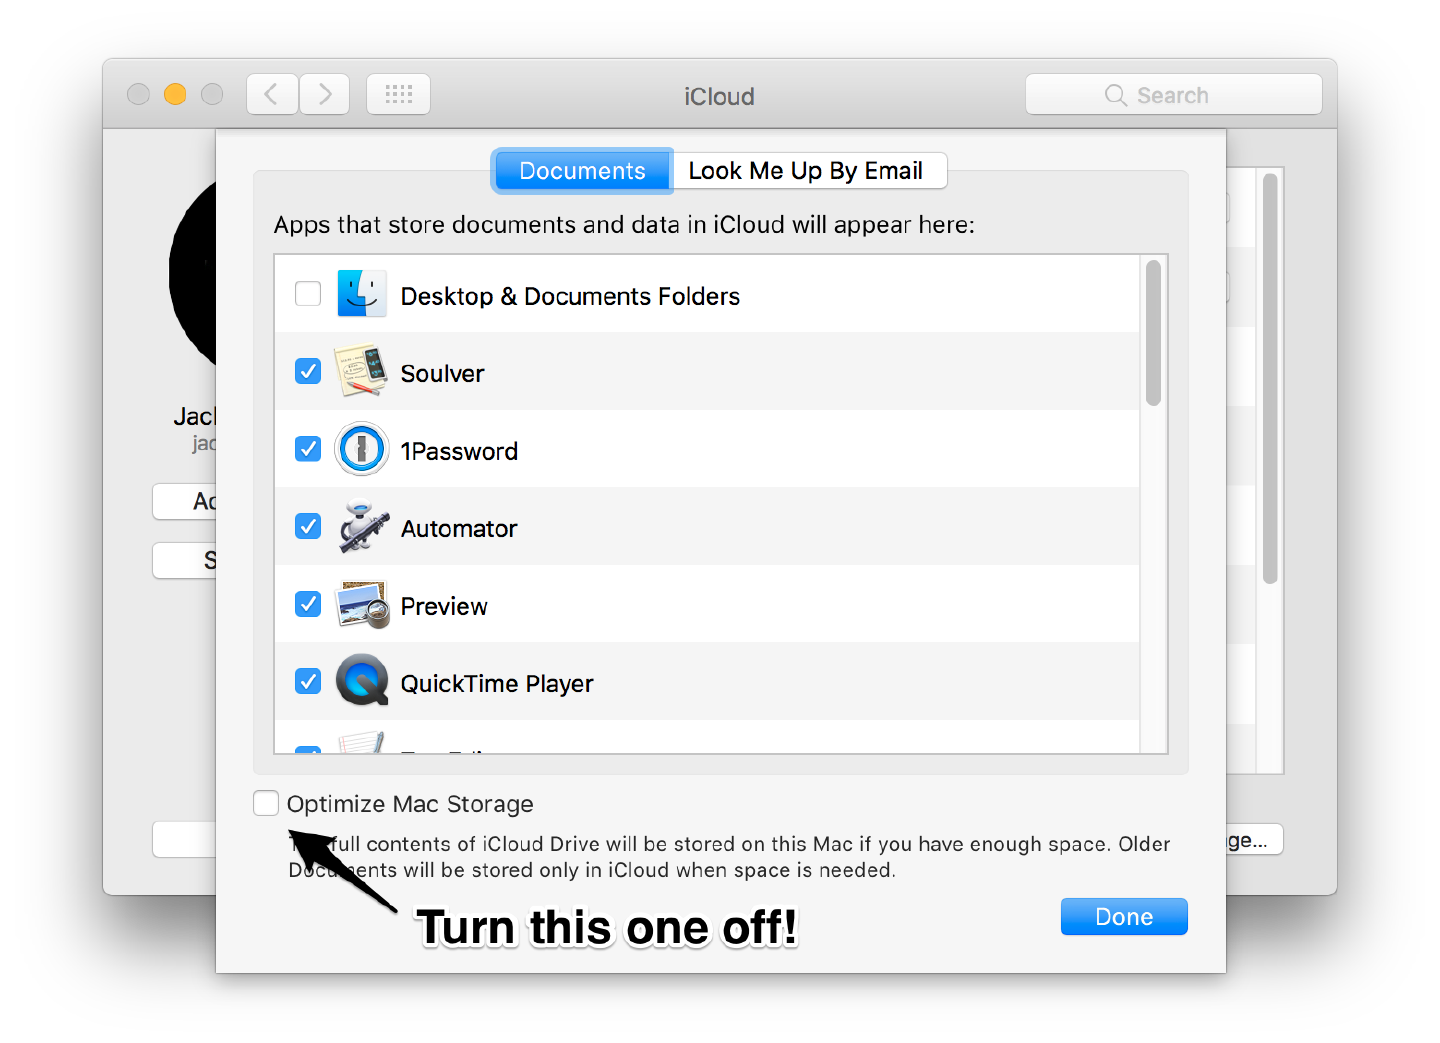
Now you can turn off that pesky Optimize Mac Storage function. So go to System Preferences/iCloud, press the iCloud Drive Options button to get to the setting. Deselect “Optimize Mac Storage.”
Now you can remove all the dummy files we created to fill up the disk, and Voilà!, we now have access to all the empty disk space without that stupid Purgeable part there.
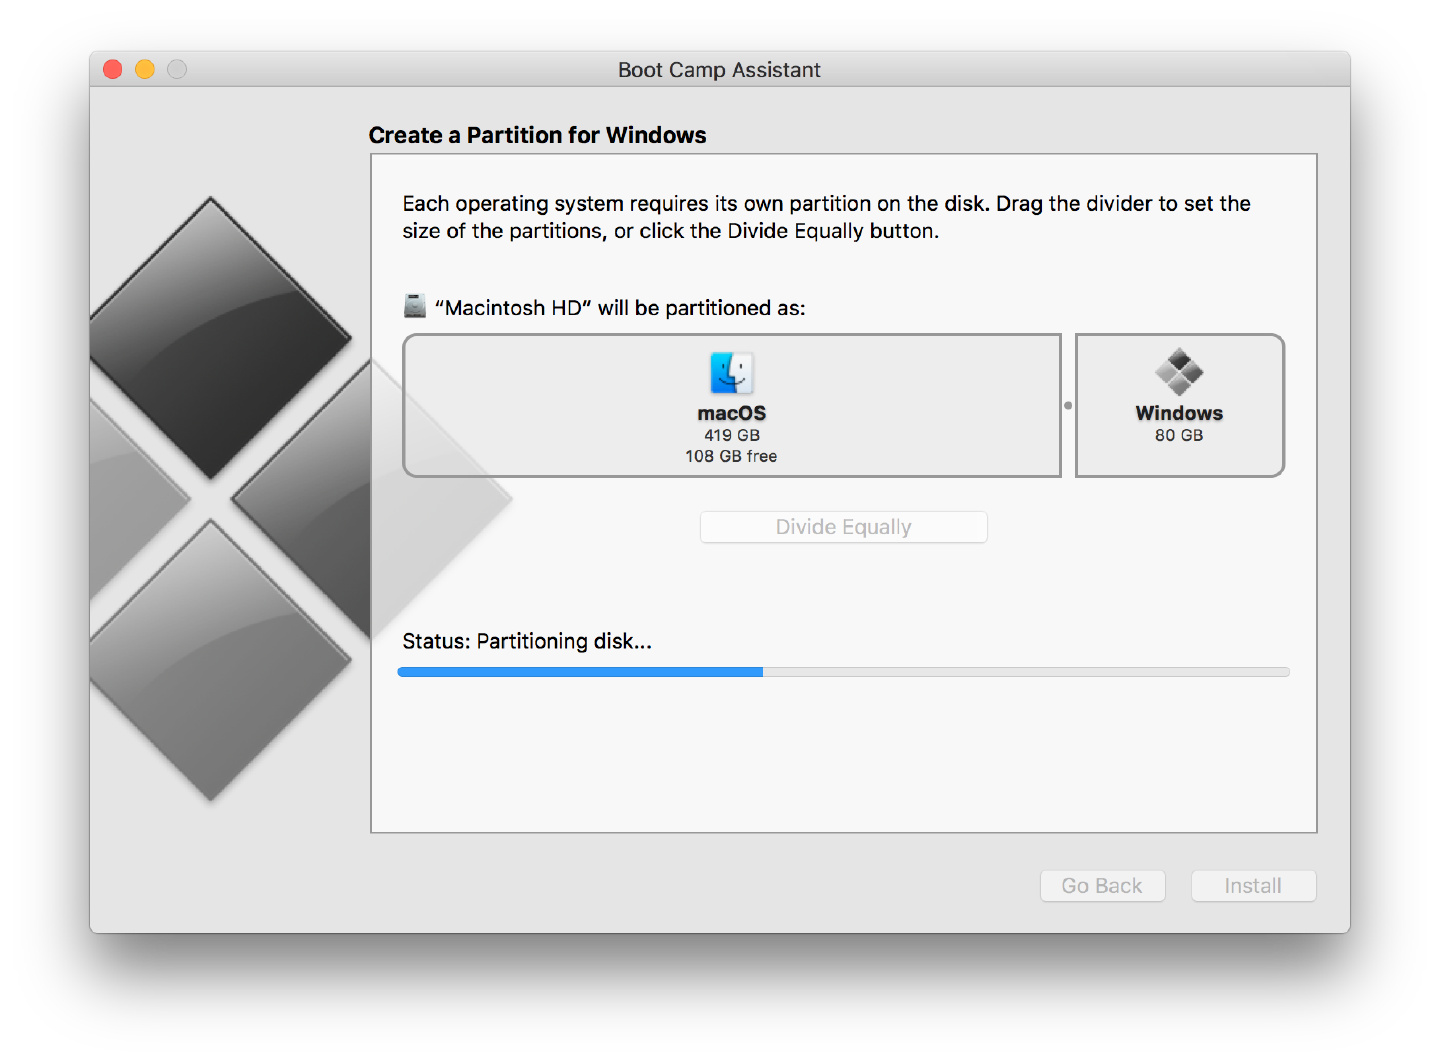
So now I could make a more substantial partition for Windows. Why a larger partition for Windows? Games of course!
This is really interesting information for me. Thanks for sharing!
Thanks for sharing the article. I have just buy a Mac so I haven't similar with this device, it has many features hard to use with me.
Thank you for this. Carried out procedure and it has worked perfectly. ('',)
Rick
Great to hear. Irritating little quirk.
This might solve the problem short term, but if you have an SSD doesn't this shorten the lifespan significantly? Could there be a way to trick macOS into thinking it's full without actually wasting write cycles?
A one time write to part of the disk blocks won't have much of an effect. Just think of the virtual memory file that constantly updates on the disk. Or logs from different processes. I don't think you have to worry about it.
Just want to say thank you so so much for this, I spent so much time trying to find this EXACT thing.
Working perfectly!!!
Happy to hear that!
Just wanted to say thank you. This was a big help. My problem was directly tied to a large Photos Library that was set to "Optimize," but wouldn't let go of the full resolution files. Completely filled my drive. Every time I would copy the "stupidfile" it would shrink the size of my library.
Worked great! Thanks so much!
Really good way to get rid of crappy purgeable space
My Mac Says i only have 2 Gigs free tho how can i create a File for 20gigs when I can't even download 1 movie!!! HELP!!!
Just make the temporary file smaller, and duplicate that. How much purgeable do you have?
Thank you so much, this worked like a charm.
You are awesome, this worked great!
I can find the files after I unchecked "Optimize Mac Storage". Now the files have become part of my "system" storage and are unfindable plus I cannot delete the "system" storage file. This is terrible, it has ruined my computer.
I can not*
I think you can use third-party tools like iMyMac Mac Cleaner to directly scan and find the unnecessary files to remove, I have tried that, it has a free version. Hope help.
Hi, is there any way you could explain this in a little more detail? When I paste "dd if=/dev/random of=~/stupidfile.crap bs=20m" into my terminal, nothing happens.
I landed up using disk utility, but it seems it was just taking a long time because of the file size. Thank you for your write up.
Hi
I followed this method and it worked like a charm. No need to create dummy files:
https://www.youtube.com/watch?v=ih3oNmNz9w0
I.e. I disabled "Optimize Mac Storage" under System preferences> iCloud>iCloud Drive I then disabled " Back Up Automatically" under System Preferences> Time Machine Restarted Mac, then re-enabled " Back Up Automatically" under System Preferences> Time Machine
Purgeable storage is gone!
Great to hear!
This was extremely helpful. It worked perfectly to get rid of all the purgeable data. Thank you SO much!
Great help!
This method is absolutely incredibley easy, thank you so much :)
Worked perfectly thank you very much
genius:)
Thanks for providing these details, again learning a lot although it is not solving my problem. I tried to start all these actions in the right sequence and I'm also getting the message that my disk is full but the purgeable space is not getting smaller. Any idea what this could be? So far I didn't deactivate the "Optimize Mac storage" because I assume you can only do this when the disk free again.
I created the stupidfile and now I can't find it. Now my mac has no space left. Where is this file?
I guess you didn’t read the disclaimer of not doing this if you don’t know your way around the computer. If you followed the instructions it should be in your desktop folder. Otherwise just search in finder...
Thanks so much for this, was on the verge of selling my mac to buy a new one because of the storage problem (75GB out of 150GB was purgable)
This is great information. Thanks so much!
genius! work perfectly
It WORKED :D THANK YOU SO MUCH.
first of all, thanks for that idea! but somehow it didn't work for me.
i created a 3GB file and then copied it several times. For some strange reason I was able to create a folder, which was 1.5 TB large?! I only have 500GB disk space. did i do something wrong? any suggestions? Heeeeelp
The same thing happened with me! I ended up creating over 21TB of duplicates, and I only have a 256GB drive! What are we doing wrong?
Folks- I too got to the same spot. Followed the same instructions and had way more files than possible. Deleted the temp files and no relief. Then I stumbled upon something in reddit related to TimeMachine files that need to be eliminated.
I made sure I had a good backup. Then issued these commands from terminal (Do at your own risk after researching)
sudo tmutil listlocalsnapshots / sudo tmutil thinlocalsnapshots / 999999999999 sudo tmutil listlocalsnapshots /
The first and third examples are reports of your disk usage. "listlocalsnapshots"
The 2nd (middle one) actually purges them "thinlocalsnapshots"
That third one will again tell you the files and you'll see they are gone.
This was the magic sauce I needed to free up all the purgeable. Once I did that bootcamp ran swimmingly. Even if you have a backup it seems there might be rather large delta files sitting around...
Cheers!
It didn't work with me ;( I guess that method doesn't work with High Sierra (APFS).
i did it in high sierra and worked perfectly - created 100 x 2 gig files (more than i had ) with 100 gig pursuable - great bit of code - might get bootcamp to work now after spending a day trying to sort it :)
YOU'RE AMAZING! THANK YOU IT WORKED
ILL pile on the praise.. Great job. Thanks. Another stupid apple feature that was horribly implemented and as usual they refuse to explain it.
u know what dude? I don't care about your story.
Cut the crap and post a solution. Stop with the intros and the anecdotes. SICK OF READING IT
Ok, I'll bite. Hi Zac Morris! You see that wheel between the buttons on your mouse? You can use that to skip parts you don't want to read. Just for fun, I did a quick search on you on the net and it seems like you hate gays and Chinese people and only browse far-right home pages. And yet you post from Beijing in China? Ah, I forgot, you're studying Chinese medicine.
Go figure...
Best of luck with that hate thing you got going...
I run the following command to create the large file which ran faster : dd if=/dev/zero of=file.txt count=10240 bs=10240
Good call! Yep, that would be faster.
You are a fucking GOD.
I take that as a compliment, even though I'm probably the worlds biggest atheist. :)
Worked well for me - purgeable bit is gone. By the way - shame on you Apple for giving us all this trouble and making us loose time on such junk. Perhaps we should start sending them invoices for our time spent fixing computers they've created?
Thank you thank you thank you! This is the best. I had 50 Gigs of purgeable space and the only other options to get rid of it cost like 50 bucks. Thank you so much
I aim to please! :)
Top Post - 15 failed bootcamp attempts are frustrating - sorted now, big thanks JZ, get a jonb at apple :)
THANK YOU!!!! My god, I have been searching for this for ages - you rock!
Oh my god thank you so so so much. This has helped me and now I can finally try to run bootcamp! Thank you soooo much may god bless you with rasberry farms and lights of coasters
Most excellent - took me right back to my heady days of UNIX support (some 18 years ago!). Love that it is sitting there right under the OS and enjoyed doing a cp in the xterm at the same time as the duplicate in Finder - Finder was quicker. Great to have real space again. Thank you.
I usually remove Purgeable Disk Space with the help of Terminal. It's convenient. Thanks for this guide.
I was able to create the file no problem, and while it was growing it was working to fill the available space. However, duplications of the file dont take up any space at all. I also tried a trick copying and duplicating your entire photo library, but the duplications of those also dont take up any space. Help?
Just a note: Use /dev/zero instead of /dev/random. It's much faster!
Btw. thanks for the article! I went from 18GB free to 138GB free on a 256GB disk! Also, OmniDiskSweeper is pretty useful. Thanks!
Thank you for the tips! I have macOS 10.13 High Sierra with the new APFS file system (why does Apple force such big changes on to us when upgrading? I should know better...) and because it relies on cloning when making duplicates of files your tip does not seem to work anymore. Been going crazy for hours now.
I tried this without success: I created several files using /dev/zero instead of /dev/random, disabled time machine backing up automatically, disabled optimisation, recreated spotlight index, went in "about this mac" into the storage, waited for the chart to appear, clicked on "manage", went to "documents", deleted them from there, went to the trash in the same window, clicked on "empty trash", then waited a long time to let the mac do something with the file system. Then the "system" was taking 385 GB instead of 60GB...
Haven't tried it with the new APFS unfortunately. HFS+ has been hanging on for a long time, but a much needed upgrade was needed eventually.
I finally managed!
Just let the following command make the file grow until it fills the whole space. It will stop on its own.
dd if=/dev/zero of=~/stupidfile.crap bs=20m
Then delete it. Then in my case try to make a time machine backup. It will fail and delete the local snapshot!
Thanks for this solution. Worked great!
Thanks for the blog. On High Sierra the duplication didn't work. I guess on apfs file system true duplicates are not copies but links.
Instead of generating random file I also used zero because it's way much faster: dd if=/dev/zero of=~/stupidfilezero.crap bs=20m
At first it didn't remove the purge data so I stopped the file and I started another one and that worked: dd if=/dev/zero of=~/stupidfilezero2.crap bs=20m
Also I had to keep closing and opening Disk Utility to get it updated
Thanks!
I used sudo tmutil thinLocalSnapshots / 10000000000 4 seemed to work...
THANK YOU!! <3
This FINALLY worked for me, Bart!
Thank youuuuuuuuu
You are the Man thanks
I just read some of the post..
You handled Zac perfectly.
09/04/2018 13:54:43 For non techies, latest version of DaisyDisk has a purge/reclaim hidden space / purgeable that gave me back 80 gb on my "slowing to a crawl" mac. I suspect that there were some files in there that were not being "reclaimed" by the OS and this did the trick for me.
Hurray for DaisyDisk! Great space visualization tool, and it really will remove Puregeable space. I tried all the methods mentioned above, and often each step resulted in a greater amount of purgeable space than I had before! (Especially the 'dd' command to create a huge file till you run out of space. Increased purgeable from 3GB to 50!)
Also the DaisyDisk documentation made me realize I didn't really need to delete purgeable space after all. As mentioned by Jack, you only really need to do this if you're repartitioning. It turns out most of the purgeable space is caches, etc., which really is purgeable. Everything else I had been reading suggested it was iCloud "Optimize This Mac" stuff, and I have all that turned off, so I was getting pretty frustrated trying to figure out where all that purgeable space was coming from.
Thanks.
"This feature isn’t well-implemented dough."
Did you mean to say "though"? Or is this an expression I'm unfamiliar with?
Regardless, thanks for showing how to reclaim that disk space.
Thanks! Missed that one.
Oh wow, thank you, that actually helped
omg FINALLY!!!! last time i just reinstalled macOS because apple support couldn't clear the purgeable data. thanks!
If the disk is formatted on the new APFS, you may find that coping the file to accelerate the process does not work because the APFS creates a symbolic link to the original files without creating new data or duplicating it. It like an alias of the original file. The process works as I was able to purge all the data off my disk!
The process works, just create bigger file and repeat the process with the Terminal. Just replace the 20 with a higher number, and change the file name to something like stupidfile2.crap
I found the same problem, I made up to 2000 copies with no change in the purgeable number. I then just let your process run until it stopped. Then changed to stupidfile1.crap. Ran again, the stupidfile2.crap. Went from 100 MB of room to 1.23 GB with 116KB left in purgeable. THANKS!
Went from 55GB to 141 GB FREE SPACE. I was using Daisy Disk but it wasn't doing anything to free up hidden space. This purge worked perfectly. Will do it again periodically. Shared your article with my friends. Thanks so much --
My precious time and mood are save with this solution. Thanks Mr.Jack sir. Of all the searches in the web that took me almost a week to tackle the problem, yours really make a difference rather than just info of what and is. Thanks again. Permission to share, Jackenhack.
Late to the game but I do really appreciate this information. After moving 22GB of data off my Macintosh HD drive yesterday, I discovered I then had over 22GB of purgeable "space". The bad part is TimeMachine thought this was real data and backed it up! And that is a stupid situation.
Your method using the terminal command fixed my problem completely. It took well over an hour to create a file large enough to eat into the 22GB purgeable, but once it did, the "stupid" file was deleted and the trash bin emptied, I was back to less than 3GB purgeable.
The only suggestion I'd make to your process here would be to stop Timemachine for doing automatic backups during the process to be re-automated when you're done.
I did take one additional step. Before I restarted automatic Timemechine backups, I erased my two Timemachine HDs. I felt that was necessary because they each had 22GB of purgable space backed up. Who needs backed up, disk consuming, empty space?
Again, thank you.
Great solution. Recovered nearly 100Gb. Running 10.14.3 and TimeMachine. In my case, I had removed 80Gb earlier in the morning, emptied the trash, and now had all this purgeable space. Maybe that falls into the same criteria.
Actually worked AFTER two days of failing to figure it out. Even Apple couldn't help me. Thank you!!!
Awesome tip. It took me a while and a few tries, but it did work. Thanks so much.
I had to create multiple stupidfileX files because it kept stopping. overall several hours almost two days with breaks.
But i regained 200GB worth of purgeable files.
Stil.... my MAC is slow so the problem is somewhere else.
Check the Activity Monitor which you can find in the Utility folder inside the Applications folder. Check CPU and sort by %. You should be able to figure out which process takes up CPU power.
Appreciate the tip Jack, works in Catalina. I ended up creating multiple 100G files, let it sit for a bit, and eventually got an out of disk message. Once the files were deleted, DF reports disk space available as 387G, happy camper again!
Finder still shows purgeable space (Availalbe: 793.02 GB (377.87 GB purgeable)), and during this process, purgeable space, under finder, never went down from 377,87GB. Once I hit close to zero, the UI tools showed inaccurate results.
DF seems to be the best gauge of disk usage. Thanks!
Super Awesome!! I had a slightly different problem, I corrupted my email account and it needed 30 GB to repair, wouldn't do it with purgeable space at 90GB. Ran your file filler, copied a bit. Deleted and bam!, Outlook could repair and all good. (All lies from apple that it will allow space if needed, rubbish, especially when its a third party program trying to do a repair)
Great post, easy to understand, thank you.
I have tried every method, including filling up the hard drive (500GB), suggested to rid my Mac OS 10.12.6 (Sierra) of purgeable space, even purchasing Clean My Mac which also did not work. Amount of purgeable space varies whether "Optimize" is checked or not, amount remains around 2.39 GB. Once it got up to 80 GB, all but the ~2.39GB could be purged. I'm at loss. Thanks.
worked a treat!! Thankyou so much!