With the latest beta firmware in the Grandstream GXP-2000 VoIP phone, the have added support for BLF. This means that you can use the quick dial LEDs for status of extensions. You can monitor all extensions on your phone. If a extension is busy, the led for that extension is lit. You can also dial directly to the extension by pressing the dial button. Very handy.
First you need to upgrade your firmware on your Grandstream GXP-2000 phone. You can download the v1.0.1.13 beta firmware here. There have been some reports of problems with this firmware, but I haven’t had any problems with it so far.
To upload the firmware to the phone you need a TFTP-server. I used TftpServer for Mac OS X. There are similar programs for Windows, like this one. But I haven’t tried them.
unpack the firmware, and put the files boot55.bin and gxp2000.bin in the root directory of your TFTP server. Now you need to tell your Grandstream phone where it can find the new firmware. So log in to your Grandstream phone by pointing your web browser to the ip of the phone (if you look on the phone display you can find the ip-number). Log in with the password (the standard is “admin”) you configured the phone with. Select “Advanced Settings” and select Via TFTP server under Firmware upgrade. You need to enter the ip-number of the computer running your TFTP server. In my case its 192.168.1.223.

Press the update button at the bottom of the web page and then press reboot. If everything is working your phone should reboot, and then the status light should blink while it downloads the firmware from your TFTP server. The whole upgrade process takes a minute or two.
When the phone has booted up again you can check the current firmware version by pressing the MENU button and then the UP button on your phone until you see Firmware displayed on your phone. Press the MENU button to display the firmware version. You should now have a phone with v1.0.1.13 of the firmware.
Ok, so now it’s time to get your Asterisk@Home server configured. Start by logging in via SSH or directly on a the Asterisk server. Then you need to write the following in the terminal.
 cd /etc/asterisk
 nano extensions_custom.conf
I have three extensions I want to have status information on: 200 is my wireless phone 201 is my wifes wireless phone 202 is a phone in my office
So to add so that I can get status info about these extensions, I’ll add the following in the [ext-local-custom] context.
[ext-local-custom] exten => 200,hint,SIP/200
exten => 201,hint,SIP/201
exten => 202,hint,SIP/202
Press ctrl-x and press yes to save the file. Now we need to tell Asterisk that this is the context to give status on.
Write the following in the terminal window
nano sip.conf
And add the following line under the [general] context.
subscribecontext=ext-local-custom
Press ctrl-x and press y to save your changes.
Now you need to restart your asterisk server by writing the following:
asterisk -r restart gracefully
The asterisk server should now restart.
Where now ready to configure the Grandstream phone to display status for these lines. So log into the Grandstream phone with your web browser again. Go to Basic Settings and set up your extensions. Here you can see how my settings would look like.
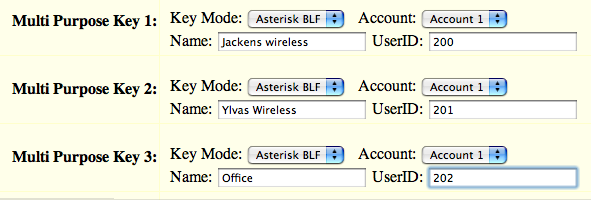 Note that the keymode is Asterisk BLF and not Quickdial. Press the update button and restart the phone.
Now try to dial from one of your extensions and the LED on your Grandstream phone should light up.
Yay!
In addition to this, you can set the BLF to monitor Zap lines. It seems for the BLF to work, you need a hint which uses an extension that dials the device you are monitoring. So with: exten => 200,hint,SIP/200 somewhere there must be an extension 200 that dials SIP/200.
The same must be true for Zap lines, though with our setup, we don't have any extensions that directly dial a Zap line, and we don't want to add any. So how do we solve this? By adding extensions that can't be accessed by a phone, but are still valid extensions. To monitor company1's Zap lines (1 & 2), for example, you can use:
exten => company1,hint,Zap/1&Zap/2 exten => company1,1,Dial(Zap/1&Zap/2)
Now, if you add this BLF field to your phone:
Name: UserID: Company 1 company1
and restart your phone, the light will light up when there is a call on Zap line 1 or 2. As far as I know, this works fine, and doesn't pose any security risks.
It should also be noted that reloading Asterisk through the CLI seems to break BLF for a GXP-2000 until you reset the phone.
In AAH is possible configure the callwating in GXP2000 ?
I want to configure AAH for my users can recive 2 or more calls at the same time and listen beep beep when recive another call.
If you just configure the first line on your GXP-2000, and enable call waiting by dialing *70, you'll see (and hear) other incoming calls. Just press the blinking line-button and your good to go.
Great help with the GXP2000. Managed to make BLF and respective speed dials work thanks to your postings! Have a question though! When using 1.0.1.9, had the ability to hear a blip for another incoming call on the GXP2000, and have Line(x) blink to notify that another call was being received. With 1.0.1.13, cannot get this to work. Is it some setting I am missing or an effect of the firmware?
Sounds like you need to enable Call Waiting on that extension. I think it is *71 to activate (or maybe *70) I have this working on my two GXP-2000.
Hi Jack, thanks for your prompt reply. I have noticed that dialling *70 blanks out the screen completely. Is this normal? Is there any alternative to enable it or what should I check in AMP/CONFs to see if it is enabled? Funny as this working with 1.0.1.9?
Am I right in saying that BLFs should blink for ringing phones and continuous when off hook? As they appear on continuously.
Busy doesn't work yet. Looks like a thing with Asterisk. So you are right, the led is on continually when busy.
Make sure you disable the Call Waiting function in your phone. You should let Asterisk handle this.
Is there some resource on the net with recommended settings for the GXP2000s with Asterisk, and Asterisk settings for the GXP2000s. The volatility of the software in this device literally drives me up the wall!
Asterisk 1.2
seems currently to have some problems with call-limit and the hint function :-(
call pick and devstate from bristuff seems to be working with the GXP2000 :-) (call pick seems to be done with _**.)
This works great with my Grandstream and AA@H v 1.5. Now I have applied the same principle for monitoring IAX2 extension, but it does not seem to work. Anyone have any ideas on this?
There is a tftp server built into Asterisk@Home. Put your firmware files in the /tftpboot directory on the Asterisk@Home box. You can also put a config file here and configure your phone using tftp.
Asterisk@Home 2.2 supports BLF by default. It will create the hints for you. All you have to do is set up the phone.
Tftp in asterisk. Cool! How could I have missed it?
First, thanks Jacken, your info is invaluable. But I think the 1.0.1.13 beta is broken? The BLF works OK but when a light is flashing you can't hit the button. I have my extensions set as below and configured in gxp2000 as asterisk blf. exten => 771,1,Pickup(297) exten => 771,hint,Sip/297 exten => 772,1,Pickup(297) Multipurpose key1 is 771 and Multipurpose key2 is 772 If I dial ext 297 from another phone and watching my gxp2000 the first led flashes. I cannot press that button as I immediately get a 404 not found or remote party not online from the phone itself as asterisk never sees it. If I hit button 2 I am able to pick up the ringing 297 from the gxp2000.
I assume this is a limitation of the firmware of the phone. I am a newbie to asterisk. Do you (or anyone listening) know if snom phones work OK this way.
TIA
Hello Jacken, I came across your blog. Need some expert advice. I have set up AAH 2.1, some GS GPX2ks, and 3 1mbs to 4 fxo digium card at my office lab. Is there is way to program true line appearence for in/outbound on these GS GPX2K or on a Polycom 601 for operator.
Since talking about operator, is there a way program seperate digial receptionist menu assign to different group trunks/channels when operator is way from her desk. Another word, let say two company running share the system but want different Auto Attendant menu.
Thx a bunch in advance!
Hi Mike,
To get the pickup working with the GXP2000 and the v13 firmware you need to know that the phone sends **771 when you hit the ringing multifunction key. You should change your dialplan to this:
exten => **771,1,Pickup(297) exten => 771,hint,Sip/297
Hope this helps.
Tony
Thanks a bunch Tony! I will give that a try. Where did you find info like that on what the phone sends? Also what I would really like to do is have the hints point to Zap lines so I can make asterisk look like an old key phone (multiline phone) system. Again thanks for you help!
I have AAH2.2 and 4 Grandstream GXP2000, a Netgear FS116P. Tge phones are running 1.0.1.13 and it all works great except... The phone lock up once a day. That is they require to be power cycled. I have now connected a phone to mains power and put in in a non POE port but it still locks it up...
does anyone know how to setup the GPX200 lines to map to ZAP ports say you press line1 and you pickup zap1 channel. basicly make it work like the old PBX you place a call on hold then another phone can press line 1 and talk to the person on hold. thanks
Mark , I was wondering how to do that!
i am unable to get the blf lights to work on my gxp2000. i have upgraded the gxp2000 to verion 1.0.1.13, I have added the lines of code to my config as documented in your blog making the appropriate changes for extesion numbers. I have read through others comments on this, and have verified things like, fresh phone reboot after asterisk restart, sip registration turned on, and host=dynamic in the sip.conf file. I'm thinking that it may be the version of asterisk I am using. I am on version 1.0.9. Does anyone have blf working with this version of asterisk?
Thanks in advance, Gregory Malsack
I'm still having trouble getting BLF to work. What does it mean when it sends back a 407 ?
SUBSCRIBE sip:102@192.168.0.101 SIP/2.0 Via: SIP/2.0/UDP 192.168.0.21;branch=z9hG4bK5e748cffd89c7453 From: "Office Line 1" ;tag=54cc68e52f7c2363 To: Contact: Proxy-Authorization: Digest username="102", realm="asterisk", algorithm=MD5, uri="sip:102@192.168.0", nonce="64990f78", response="8e94af979817ae382e2ac2a8ba506fab" Call-ID: 571ca36b7f9a7c48@192.168.0.21 CSeq: 4721 SUBSCRIBE User-Agent: Grandstream GXP2000 1.0.2.13 Max-Forwards: 70 Allow: INVITE,ACK,CANCEL,BYE,NOTIFY,REFER,OPTIONS,INFO,SUBSCRIBE,UPDATE,PRACK Event: message-summary Expires: 60 Accept: application/simple-message-summary Content-Length: 0
15 headers, 0 lines Using latest SUBSCRIBE request as basis request Sending to 192.168.0.21 : 5060 (non-NAT) Found peer '105' Transmitting (no NAT): SIP/2.0 407 Proxy Authentication Required Via: SIP/2.0/UDP 192.168.0.21;branch=z9hG4bK5e748cffd89c7453 From: "Office Line 1" ;tag=54cc68e52f7c2363 To: ;tag=as3f38ea3c Call-ID: 571ca36b7f9a7c48@192.168.0.21 CSeq: 4721 SUBSCRIBE User-Agent: Asterisk PBX Allow: INVITE, ACK, CANCEL, OPTIONS, BYE, REFER Contact: Proxy-Authenticate: Digest realm="asterisk", nonce="6e9eed5c" Content-Length: 0
to 192.168.0.21:5060 Scheduling destruction of call '571ca36b7f9a7c48@192.168.0.21' in 15000 ms
Have got the BLF working, however i'd like it to show if somebody is in DND or taken themselves out of a hunt group, is this possible?
Hi, I have GXP2000. I lost psw admin and keypad is locked (so I cannot use menu config-> sip, upgrade, factory reset) How I can recover my password or make hard reset. IP of my PXB2000 is 192.168.2.100 and ip of my pc is 192.168.2.23.
I check on web for TFTP but I dont understand nothing so please tell me step to step guide for resolve my problem. Thanks
Great article! We are linking to this particularly great post on our website. Keep up the great writing.