
If you are on the lookout for a sub $30 Multimeter (or $15 on eBay) for working with low voltages, the best one right now in my opinion is the cute and tiny Aneng AN8008 TrueRMS Multimeter or the newer model, the Aneng AN8009 with NCV and temperature measurement. They have a lot of functions and can measure µA current, and both are a 9999-count meter. The continuity tester is reasonably fast, but there is one little problem that bothered me. It takes 5 to 10 seconds for it to settle on a correct voltage reading. When it finally ends, it’s spot on, but the waiting is annoying. But fortunately, there is a simple fix for this problem.
Fixing The Long Settling Time
After taking the meter apart, I started by measuring the input DC voltage to the meter. The measurement shows that the DC rail is quite noisy.

 The noise spikes are over 30 millivolts from two AAA batteries! There’s something adding noise on the DC rail.
Decoupling Capacitors
There is a decoupling cap on the input, a Rubycon 100 µF 16 Volt YXA capacitor, but when measuring it, the ESR is 1.4 Ω which is quite high. So first I replaced it with a low ESR Panasonic FM 100 µF 25V capacitor that measured 0.4 Ω instead.
Fortunately, there are three unpopulated 0805 sized pads on the board, marked C14, C15 and C16, so I soldered one 0.1 µF, 1 µF, and a 10 µF 0805 capacitors before I installed the 100 µF capacitor. Any run of the mill 0805 capacitor will do. But it doesn’t hurt to use a name-brand like Murata, Panasonic or similar. Here is a search for the required capacitors on Digikey.
The modification cuts down the noise on the power rail to one-third of what it was before the amendments! But wait, there’s more!

Now the peak to peak values where 8.5 millivolt instead of 30 millivolt, and there’s a lot less high-frequency noise. But what happens if we increase the capacitance even higher?

I installed a 1000 µF capacitor and knocked down the noise down to 3.6 millivolts P-P! I tried a 3300 µF, but it was a diminishing return, so I decided to keep the Panasonic FM 1000 µF 10V capacitor installed. A noise cut down from 30 to 3.6 millivolt will undoubtedly help the ADC to give more ENOB. Here’s a search for the right type of 1000 µF capacitor on DigiKey.

Improve The Reference IC
The Aneg AN8008 uses a 1.2 Volt reference IC, the ICL8069DCZQ. It’s decoupled with a 0.1 µF capacitor, but when looking at the datasheet, they recommend a 4.7 µF capacitor. So I desoldered the small 0603 and stacked two 2.2 µF capacitors in its place because I didn’t have a 4.7 µF capacitor at hand. Same as before, any run of the mill 0603 or 0805 capacitors will do. But I prefer to buy name brands. The capacitor doesn’t have to be of high voltage rating; they are there just to filter out the noise to ground.


So Did It Make A Difference?
Yes! The meter settles on values instantly, instead of 5 seconds of drifting back and forth. The reading is also much more stable over time because it used to wander around. It’s also spot on when compared to my HP 34401A 6 ½-digit multimeter.
-

- 2.5 Volt Reference
-
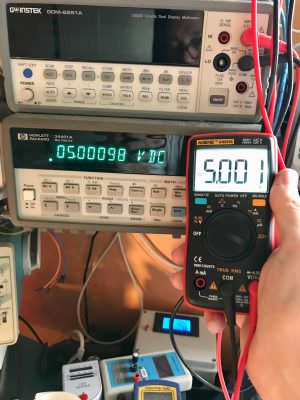
- 5 Volt Reference
-
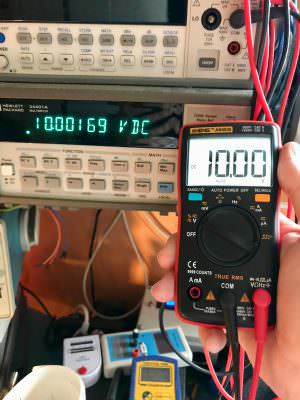
- 10 Volt Reference
So now a $25 multimeter performs even better. If you need a small portable multimeter (you can never have too many multimeters), this is a great buy! Don’t believe the CAT rating on it. I wouldn’t work with anything high voltage with this unit, but for low energy, it’s perfect. And after these modifications, it’s even better!
Wolf-Burkhard Menzler says
Thanks for your suggestions and the way to do it.
What size (diameter and height) and contact pitch does the Panasonic 1000µF / 10V Low ESR capacitor may have for this replacement?
Just checked the listings of Digikey and there are several variants of different sizes and contact pitches available. Because I don’t have my Aneng AN8008 yet there is no way for me to tell right now.
Wolf-Burkhard Menzler says
Your version of that electrolytic capacitor shown looks quite different (longer and less diameter) than the ones I found.
Jack Zimmermann says
Hi!
I used Panasonic FM 1000 µF 16Volt capacitor. It’s longer than the one that I replaced, but does fit without a problem.
milton says
jack. you said that you used 0.1 µF, 1 µF, and a 10 µF 0805 capacitors on C14 to C16. that means that you also kept them soldered besides the 100 µF 25V capacitor. or did you just put them to test ?
excuse me if it sounds a little n00b-ish, but i’m a real noob here…
lurker says
I did a google image search for “Panasonic FM 1000 µF 16Volt capacitor” and found several places that sold the same type. Try that. I think you can find something similiar.
Thanks for the post Jack! I will problably make the same mods in the future. I like the multimeter aswell.
Involvement says
Usually a type with greater length to width ratio have better ESR specs due to the contact area being longer, and the foils are shorter (so closer to the contact point).
Akimitsu Sadoi says
Thanks for the post! The timing was perfect, as I just got the same DMM. Although I did not find the same problem, I opened up and check the ripple. I found the same situation.
Mine had a non brand electrolytic cap, so I removed it and replaced it with 2x 100uF, 10uF, and 1uF MLCCs. The ripple is now reduced to under 5mV.
Dave B. says
I’m wondering if the ANENG 8002 and the 8009 have the same problem.
Can anyone who has these other meters check?
Myk Cent says
As i see it in the picture, your 1000uf capacitor connection is parallel to the existing SMD capacitor… is it right? or is it better to pull out the existing capacitor in it?
Ivo - OK1TYR says
Anneng 8009 has almost the same layout and also the problem (there is an additional loop for the NCV test).
However, after I used it for the first time, I noticed the long settling time. It is fixed now :-))
Thanks for the good catch, Jack!
P.S. I suggest check the original soldering. I found several suspicious soldered joints…
Dancy says
So what I need to replace?? I bought aneng8009. What I need to buy new and solder, capacitor Panasonic FM 1000 µF 16V, 4.7uF 0603, and what else??
Loco says
Can i use 1000 µF 25V lowesr capacitor instead 16V? And those three decoupling capacitors which value goes paralel on big elco pins and on C15 and C16???
Chris says
LOL, engineering paranoia at its best. Great? Article? You offer no links whatsoever to the replacement parts. Good job? Not!
I mean I understand because you’re hacking in an “unregistered” space. However, you did stuff and had results yet offer no concrete results because… you’re afraid of illegal Chinese manufacturers? WTF? Come on… Please link to the actual replacement parts. Trust me, those cheap Chinese assholes won’t even blink.
minime says
What a BS. Everyone who does electronics tinkering on this level should be able to figure out what to use given the numbers. It s as if you complain that a woodworker doesn’t link you the screws he uses and only tells you the length.
Jamie Norwood says
As someone who just got this as their first MM, and is only new to such things on a hobby level (soldered my first thing ever a year or so ago), is it worth it to do this, either for need (still not sure what this thing can really .do. now that I have it.) or just for the learning and practice?
Jack Zimmermann says
If you’re new to electronics, I would wait until you feel comfortable with soldering surface mounted components. It’s easy to kill your multimeter if you do anything the wrong way. The meter works ok standard, with the modifications, It just becomes faster when measuring.
george says
The decoupling capacitors and 4.7uF (or stacked 2.2uF) was enough to get a quick response. I left the 100uF electrolytic in place.
Excellent hack!
utk says
I just received a brand new AN8009 and I don’t have the settling delay issue when reading voltages.
It just needs 1 or 2 seconds to get a stable reading.
So I decided to don’t change/add anything.
SteveB says
1-2 seconds is too long, this fix makes is a fraction of a second. 🙂
brad says
I have two identical meters. I just got around to modding one of them with a 100uF tant, 22uF MLCC, 1uF MLCC and 100nF MLCC, as well as replaced the reference capacitor.
Side-by-side, it’s impossible to tell the difference in speed or accuracy on mine. Both are stable, both take the same time to settle.
I kinda suspect that the factory 100uF caps vary wildly in ESR, and I’d guess mine were both fine (I chucked it before I thought to test).
Choco Late says
In my case, all those changes only fucked a good an accurate product. I had to apply reverse and leave how it was at the beginning (without those hell stupid changes)
SteveB says
Are you sure you did it right? All others here got great results. It does work, so you may want to consider giving it another go, it is worth the effort!
Spyros says
you think the An8009 will have the same pads unpopulated?
kay says
This modification is worth its weight in gold!
What a huge difference it makes to using the 8009 meter, instead of having to wait around for the display to “settle” down to take a measurement (you couldn’t be in a hurry, it took a second of two), the display now reads the measurement within a fraction of a second.
I simply used a 1500uf 10 volt low ESR capacitor, a 0.01uf capacitor and a 0.1uf capacitor, all conventional through hole types. There is more than enough room to get them in and they are all in parallel any way, so it doesn’t make any difference which one goes where, just get the polarity right on the electrolytic!
I also tagged a conventional 4.7uf electrolytic capacitor across the voltage reference decoupling capacitor too.
Thank you for sharing this modification, it truly makes an inexpensive multimeter in to a very good instrument indeed!
Regards,
Kay Who.
chris2u says
Thanks Kay……I was going to ask if anyone had used through hole components OK..
It’s quite interesting how this thread (and obviously these meters) started out in 2017 and are still sold and popular in 2022 five years later !
Thilina Jayasinghe says
Wonderful & Thankyou for inform . Its really helpful
Andy says
Thanks for this mod, now only I could figure out how to disable that annoying beeping after 5 minutes of ON time. Or at least set it so that it’s at 50 minutes instead of 5.
Considering the meter lasts for hundreds of hours, I couldn’t understand why someone programmed 5-minute beeping and 7-minute power off time.
Matthias C. Hormann says
On my AN8009, holding down the “SEL/HOLD” button while switching it on makes it beep a few times and disable auto power-off. Maybe this helps.
Manuel says
Thanks for this mod! I will probably perform it on my just ordered Aneng AN870 which has the same components and same unpopulated C14-C16 pads.
One question though. Why did you select 0.1 µF, 1 µF, and a 10 µF for these? The silk screen indicates that 22 µF caps are supposed to be installed there. So why the deviation?
Also which one went to which pad?
Jack Zimmermann says
This is just an easy technique for covering a broader spectrum of noise. The lower the value, the closer to the component you want to decouple.
Manuel says
First thanks for the quick reply (I got no notification so only saw it now).
I got my AN870 yesterday and it got the same components but a different board layout. I am very certain that C11 is the one for the reference IC (that’s gonna be a challenge 😀 ). But I have trouble figuring out which one of C14-16 is the one “closer to the component to decouple”. Can you maybe help me here?
Following link has an image of the PCB: https://www.dropbox.com/s/nlcu6b1rmmqdjjs/AN870_PCB.jpg?dl=0
The image is actually borrowed from https://lygte-info.dk/review/DMMAnengAN870%20UK.html and my board already has an electrolytic cap marked as Low ESR but I will nevertheless replace it with a 1mF Panasonic FM.
Jack Zimmermann says
That’s not even the model I’ve modified. Have you measured the voltage with an oscilloscope to check if there’s any noise? No need to fix something that ain’t broke.
Paul Fletcher says
Do you happen to know what this meter’s input resistance is when measuring DC volts? Is it 10 M ohm or 1 M ohm?
I am looking for a meter with 10 M ohm input resistance.
Thanks, Paul
ToniPons says
Hi everybody. My an8009 just arrived and now I’m trying to figure it out how to “fix it”.
I can see 0805 sized pads C14, C15 and C16, but C14 is already used for 100µF – 10v cap. Doesn’t matter?
Now, if the ESR Panasonic FM 100 µF 25V replaces the original Rubycon 100 µF 16 Volt YXA (located in C14 pad), where should I put the other big capacitor also mentioned up there ( Panasonic FM 1000 µF 10V )? I cannot see on the pictures the first one, only the 1000µF-10v.
Also, no way I would be able to solder one 4.7 µF ( 0603 size ). Too small for my skills.
Thanks for your help!
Jack Zimmermann says
Replace the 100 µF capacitor at C14 with a 1000 µF electrolytic capacitor. You have to desolder the old one first.
You need a microscope or a looking glass when soldering the SMD caps. Just remove all the solder with a solder braid, add fresh solder on one of the pads. Use a tweezer to hold the SMD capacitor and solder one side by heating the pad with solder. Then solder the other pad. Quite easy when you get the hang of it.
ToniPons says
Thnks!
Manuel says
Sorry for starting a new comment, but the page won’t allow me to reply to your last response.
Actually I have not measured the noise (where to put the probes?) but as it has a very long settling time I assumed it would be the same issue. Also it uses just a 0.1µF cap for the reference IC and has the three unpopulated cap pads near the electrolytic cap.
Also I am a tinker-because-you-can kind of guy and adding more caps won’t hurt. 😉
P.S.: You have my email address as part of this comment if you like you can contact me this way. 🙂
Jack Zimmermann says
The best way of measuring noise is to use an oscilloscope with a short ground lead, like this picture.

Compare it to my results in the article. If you have a lot of noise, yes, then it’s time to add some caps.
Good luck!
Andrzej Sochon says
Hi,
where to put the probes to measure noise?
Jack Zimmermann says
On the main 100µF capacitor and GND. Use an oscilloscope with a short ground lead…
Andrzej Sochon says
Okay, thank you very much. AN8009 should arrive to me in two weeks.
I am ready with an oscilloscope and a few low ESR capacitors to check noises and follow your great description.
Angus says
Great article thanks for sharing!
Chris, you sound a bit paranoid, relax 😉
Andrzej Sochon says
My brand new AN8009 arrived yesterday – is small and looks very nice. I made a few measurements and I do not have the impression that the response time is long. Maybe my old instruments have made me so accustomed or maybe the manufacturer has made the necessary modifications. I have not looked inside yet. I’ll let you know.
Andrzej Sochon says
Today I looked inside – there is factory mounted 100 µF . My oscilloscope is very old and I do not have possibility to measure noise amplitude. Noise looks very similar. I replaced 100 µF by 0.1 µF + 1000 µF. Ampltude of noise decreased significantly. Does it make my device to be faster – I hope yes.
Thank you very much for inspiration.
Best Regards
Andrzej
Jack Zimmermann says
There’s been mixed feedback when it comes to the AN8009. There’s a more noticeable difference on the AN8008, but I got an early version of the AN8009, so maybe they’ve improved the circuit in a later revision. Good luck with your new multimeter, it’s a great one for low voltage use.
Andrzej Sochon says
A few notes about the meter. Very clear screen, good backlight. Easy to use. Useful additions. The device is very handy, small and surprisingly light. I got used to heavier devices, framed with an additional rubber cover, so they rest solidly on the table. I will try to stick the rubber feet pads so that the meter slides less on table surface.
Ahmed Hussain says
i have a AN8009 multimeter. in this meter when i measure impedance of a coil to ground in diode mode impedance is showing 0.000v but with other multimeter it shows 0.0004 v which is correct impadence. how to solve this issue . please guide me. thank you
paul says
I know this is an older thread – but still much appreciated! I was wondering if you might know if/how the auto shut off feature could be disabled on the AN8008. It’s so annoying and cuts off while you’re actually using it!
Patrick says
Thank you for the post! I own an new AN8009 and modded it accordingly.
The meter settles much faster on values, however noise was only cut down to 15mV, from 25 before. Definitely an improvement though.
milton says
jack. you said that you used 0.1 µF, 1 µF, and a 10 µF 0805 capacitors on C14 to C16. that means that you also kept them soldered besides the 100 µF 25V capacitor. or did you just put them to test ? that is to see if i need to get also those ones…
excuse me if it sounds a little n00b-ish, but i’m a real noob here…
Mark says
Today i was in search how to easy add temperature reading port to AN8008(actually how to separate V- of opamp that multipies K type signal from negative probe as it separated in this device) and found this article. By the way made all modifications, and it works damn good! Thank you!
Michal says
With this mod, power rail noise dropped from 80mV to 20mV Vpp.
However, I have Aneng AN870 and 100uF cap inside had decent ESR of 0.5 ohm.
Thanks for the guide.
a1 says
My AN8009 from Jan 23 2020 has 470 µF 0.4Ohm && 4.7 µF decoupling cap already installed, C14-C16 smds missing, 16mV ripple on battery contacts
Antonius says
Hi, is there any way/chance to modify/hack the ROM of the AN8009, and so it will be able to generate the Square Wave output as on the AN8008?
bvrlo says
So if I understand correctly, the first modification — adding capacitors across the battery — will not make the measurement faster, it will only make it more accurate? And to make it settle faster, one needs to add more capacitance to the output of the voltage reference? Any idea what is causing the noise or why does it have a frequency of cca 1.14kHz?
Brad says
I recently bought 2 new AN8008s from the “official” Aneng store on Aliexpress. My scope is packed up so I’ve been unable to look at rail noise measurements. I will say the meters were fast and precise out of the box. The capacitors configuration and values are as outlined in this blog post although the Electro I removed had an ESR of 500 milliOhms on my Bob Parker ESR meter.
As an experiment I performed the listed upgrades to one of them, then did a side by side on DC Voltage, resistance and capacitance. I’m pleased to say it made absolutely no difference, so they’ve made some improvement somewhere that mitigates the slow settling (at least in the pair I bought). I’ve marked the upgraded unit, but I’m not going to bother upgrading its sibling at this stage.