![]()
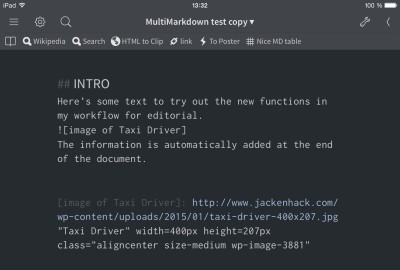
![]() I’ve tried a lot of blogging apps for the iPad, but none of them handles images the way I want. Images gets the weird name iOS has assigned to them which is not good for SEO. When I upload images to WordPress, I want them to end up in the WordPress Media Library and have all the theme defined sizes created automatically. Just like when you upload from the web interface in WordPress. There’s an added problem when you want your site to support images displayed on a Retina or high DPI device, showing the picture in high resolution using a plugin like WP Retina x2. My favourite text editor on iOS is Editorial app, So I made this Workflow so I can do the naming, resizing and uploading of the images directly inside the app from my iPad or iPhone 6 Plus. You can select which of the theme defined image sizes you want to display and also set the image alignment. This workflow works excellent with the WP Retina x2 plugin, which is the one I use on my site. When everything is done, you have an MultiMarkdown referred image link at the cursor position in the text editor, and the image link and information like width, height and alt-text is added to the end of the document. This makes a very convenient way of blogging on the iPad.
I’ve tried a lot of blogging apps for the iPad, but none of them handles images the way I want. Images gets the weird name iOS has assigned to them which is not good for SEO. When I upload images to WordPress, I want them to end up in the WordPress Media Library and have all the theme defined sizes created automatically. Just like when you upload from the web interface in WordPress. There’s an added problem when you want your site to support images displayed on a Retina or high DPI device, showing the picture in high resolution using a plugin like WP Retina x2. My favourite text editor on iOS is Editorial app, So I made this Workflow so I can do the naming, resizing and uploading of the images directly inside the app from my iPad or iPhone 6 Plus. You can select which of the theme defined image sizes you want to display and also set the image alignment. This workflow works excellent with the WP Retina x2 plugin, which is the one I use on my site. When everything is done, you have an MultiMarkdown referred image link at the cursor position in the text editor, and the image link and information like width, height and alt-text is added to the end of the document. This makes a very convenient way of blogging on the iPad.
Features
- uploads images directly to WordPress Media Library which creates the different image sizes defined in WordPress theme
- Able to name the image and give it an alt-text
- Choice of uploading original size or to reduce the image size
- Choose left, center or right alignment for the image
- Creates a short referenced MultiMarkdown link at the cursor position and adds the image info at the end of the document automatically
- Adds the images pixel dimensions for HMTL5 compliance
Download The Workflow
Begin by downloading the workflow by following the link and press install on your iOS device.
Prerequisites
This workflow use the wordpress_xmlrpc module, so that needs to be installed in Editorial before you can use the workflow! But I’ve written a guide about how to install the module/library here. You could also add the wordpress_xmlrpc library via iTunes, but I haven’t tried it. If you forget to install the library, the workflow will warn you and also link you to instructions on how to install it. It’s a one time installation. I’m thinking of making this automatic, but I haven’t had time to look into it yet.
Before you begin
You need to edit the Workflow and add the URL of your site, your WordPress username and password. It’s easily found in the beginning of the workflow.
How to use
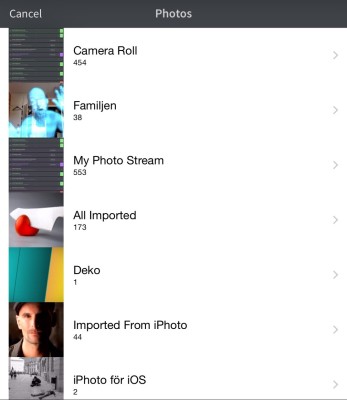
Put the cursor where you want your image to appear and start the Workflow. After starting, you get the standard iOS image select dialog to choose an image from your iOS image gallery. So select the picture you want to use.
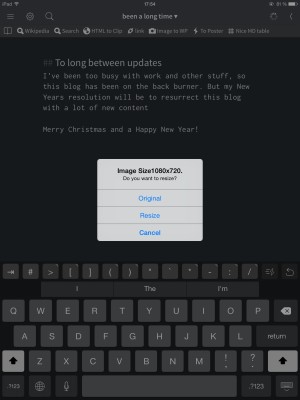
After selecting the image you get a dialog where you can upload either the full resolution image, or resize it to your liking before uploading.
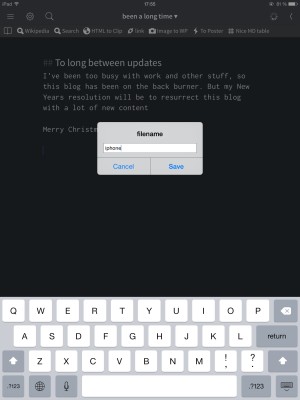
Enter a filename for the image. Use something descriptive, but avoid spaces and substitute them with “-”. If you forget and use spaces, they will be replaced by “-” automatically. You don’t need to add .jpg at the end of the name if you don’t want to, it’s also handled automatically.
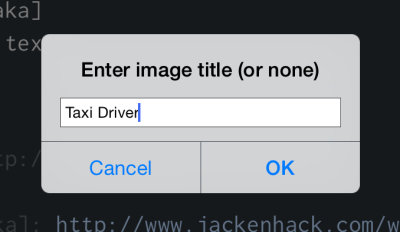
Enter an image title if you like. If you don’t need an image title, just press OK.
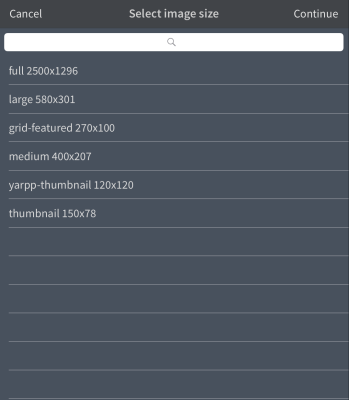
Next up is a dialog box where you can select one of the predefined image sizes you have configured in your WordPress theme, or go with a full resolution image.
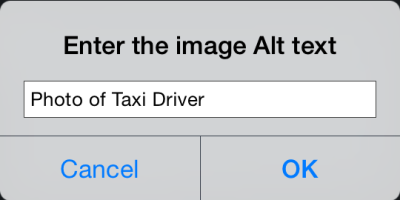
Enter an alt text for the image. You need to do this, because it’s used as the marker name in the MultiMarkdown link. And you should always enter an alt description for images anyway. Both for visually impaired and for Google, because Google Image use that text to get a hint of what the image is depicting.
When everything is done, you should now have a referenced link inserted and the image link information added at the end of the document.
When it’s time to export to HTML, you need to use the MultiMarkdown function. Just make a simple export workflow like this one.

Happy blogging!
Maciej says
That’s what I was looking for my iPad workflow! As an editor at Polish magazine about Apple I was looking for a way to publish my posts from iPad. I knew Editorial is powerful tool and was looking for a way to publish photos to WordPress. Then I found your post.
I did everything you wrote: get pipista file into Editorial (not via iTunes though, but uploaded file to Dropbox, downloaded it to GoodReader and then Open In Editorial), and installed xmlrpc-Wordpress plugin. Then I downloaded your workflow, provide site URL, login and password. Then, in new document I tried to finally run that workflow. Unfortunately without success. Right after initialisation I got “Problem logging in” notification. I’ve checked site URL, login and password couple times to be sure there were no mistake, but the workflow still brake at same stage.
Can you help me find the cause of that problem?
Maciej says
Nevermind. I found the solution. In Set SiteURL I had to provide full path to xmlrpc.php file (like http://domainname.com/xmlrpc.php) not just the site URL (http://domainname.com).
Nevertheless, thank you one more time for that great workflow! 🙂