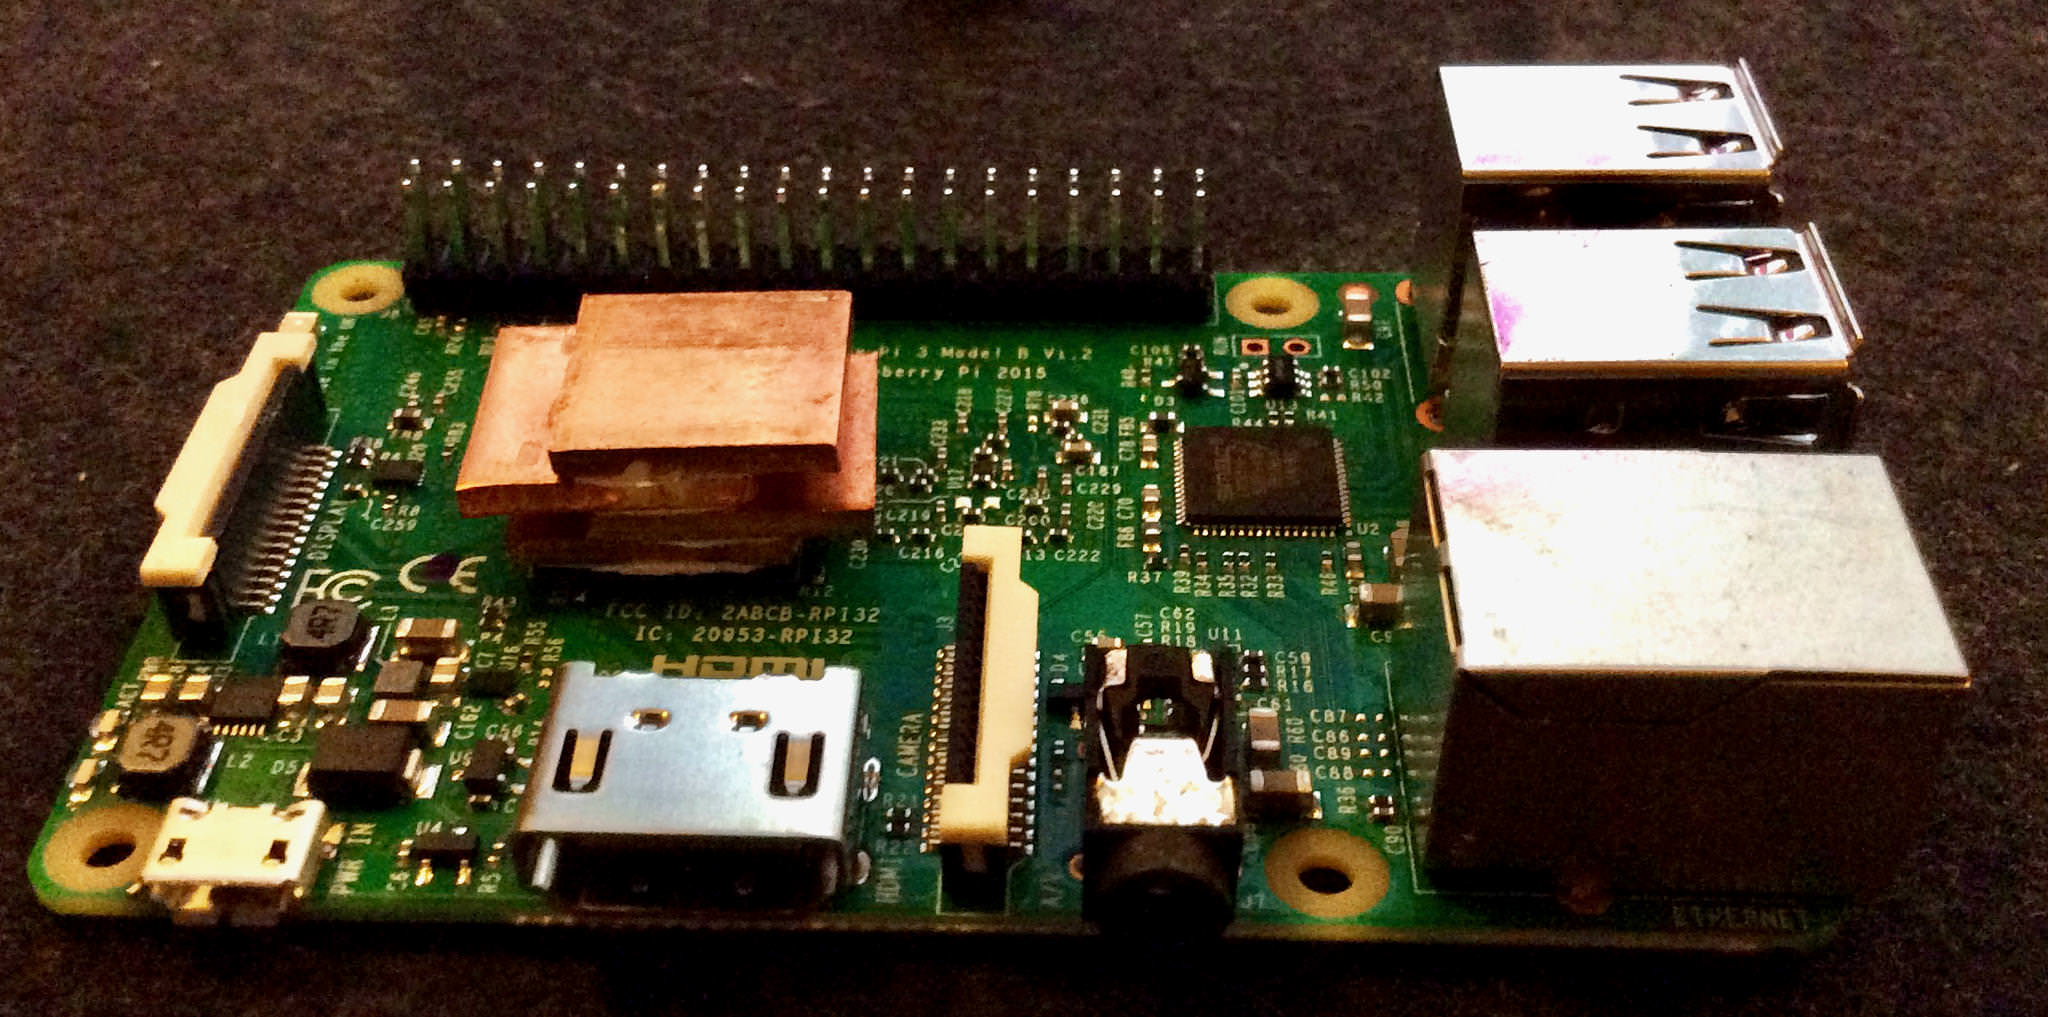
I needed a cheap heatsink for my Raspberry Pi 3 that I use as a music player/server. To maximize performance, I wanted to overclock the computer for faster searching and handling of all my music. I’ve managed to overclock my central Stratum-1 NTP server to 1350MHz without any problems, but the dinky little aluminium heatsink was way to anaemic, so I found a very cheap DIY solution to my question. With this heatsink, I can run the Raspberry Pi 3 at 1.5GHz all day at full tilt without any issues!
DIY Heatsink
When it comes to heat dissipation, there’s no substitute for size and the right material. Copper is massive and has excellent heat transfer abilities, so I searched and found cheap GPU heatsink shims that were 15x15 mm for under $8 including shipping. All I needed to do was to stack a lot of them on top of each other while having them protrude on each side for heat dissipation as you can see in the picture. A pleasant side effect is that the heat sink isn’t high, so I can have my DAC-card mounted without a clearance problem. So I got some cheap heatsink compound and regular super glue and just put the heatsink compound on each copper plate, leaving space in the middle for a small dab of glue. Yes, I super glued the copper plates directly on the CPU, because, hey, a Raspberry Pi is cheap!
And the results are excellent!
Overclock settings
Here are the settings in the setup file /boot/config.txt for the overclocking part.
# Overclocking
arm_freq=1500
sdram_freq=550
over_voltage=6
temp_limit=85   #Will throttle to default clock speed if hit.
Running the command
sysbench --num-threads=4 --test=cpu --cpu-max-prime=2000000 run
For over an hour, the temperature never exceeds 65 C° and this while at the same time playing 24-bit 192KHz audio. Raspberry Pi 3 mounted inside a box with a DAC card added on top! Not exactly optimal, thermal wise. I’ve waited two months before writing this up because I wanted to make sure it would work in the long run. It’s now been running continuously now without any glitches. So the next step is to try the same thing on my NTP server. It’s going to be interesting to find out if I can go higher than 1350MHz that it’s currently running when installing in my 3D printed case with a fan on top. Hoping for 1.5GHz on this one as well naturally.
Doing More Useful Stuff
A commenter mentioned that doing a kernel compile would simulate the hard use of the Raspberry Pi 3 better, so I downloaded the source code and did two compiles after each other of the entire kernel source. Highest temperature? 66.6 C° or 150.8F. Must be working with a daemon that made it come up with that number.
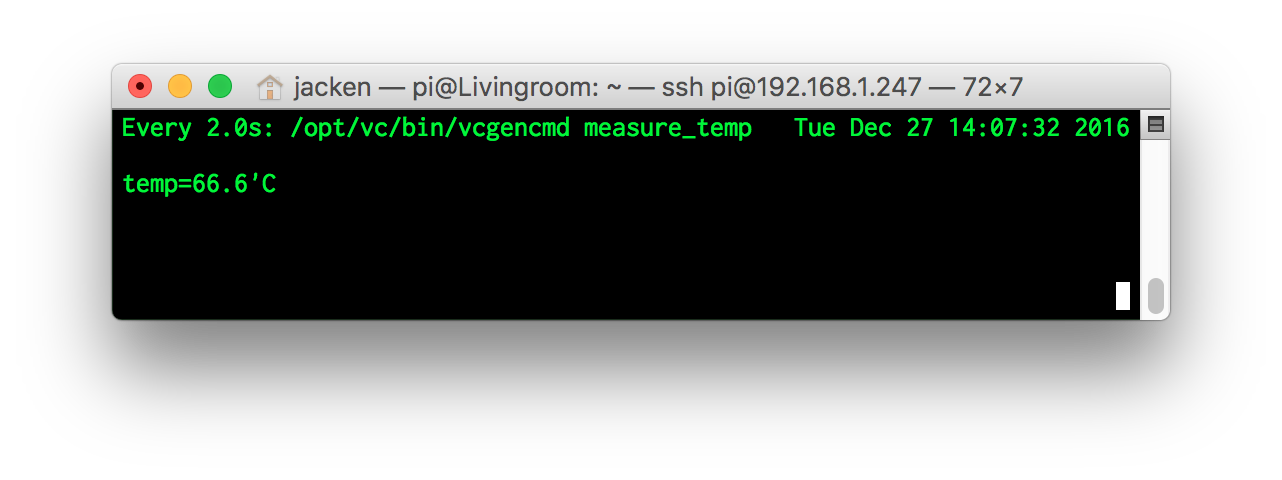
“The Number of the Beast!”
Power
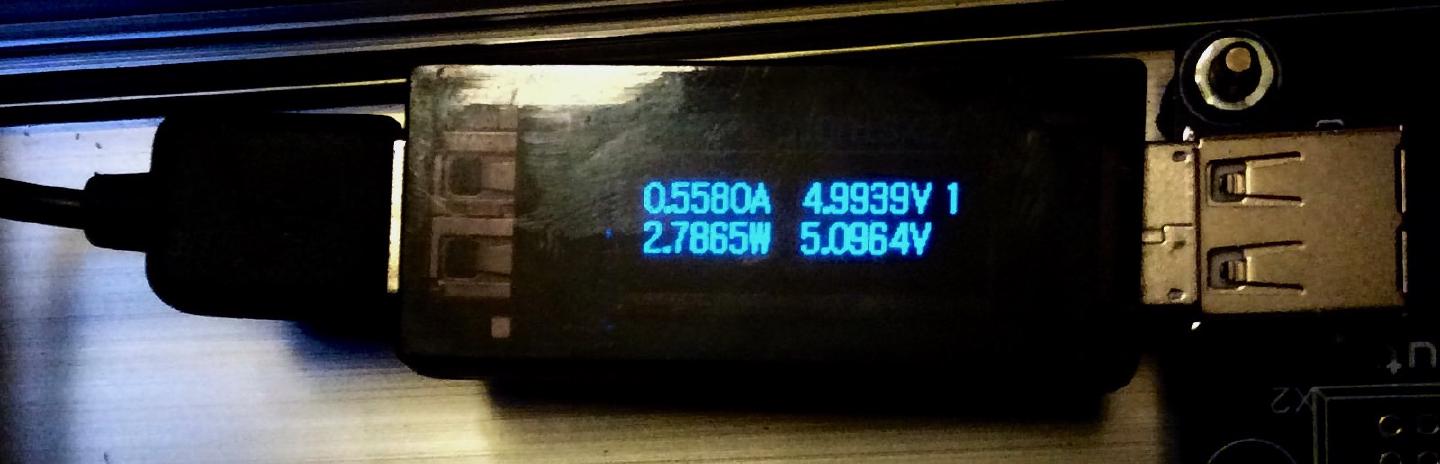
I was just a bit curious how much current the Raspberry Pi 3 would draw because I have a 5 Volt, 1 Ampere power supply and there’s a lot of talk about needing 2 Ampere. I used my beloved YZXstudio USB Power Meter to check how much current it uses and to my surprise it only used around 560 milliAmpere, using up about 2.8 watts. The Raspberry Pi 3 running with 100% load on all four cores. The DAC wasn’t running when testing though. I had to double-check that number because I thought it would be much higher, but it’s correct. Nothing connected to the USB ports and no screen attached. But pretty good!
Maybe I just got lucky with this card, and it’s a fluke because there are differences between cards. But I think this is an excellent alternative to the cheap aluminium heat sinks that everyone is selling anyway.
Hi!
Although I think the DIY heatsink design is very clever, I'm not sure if the software task at hand is that daunting. I've been using a Raspberry Pi 1 + for almost two years non stop, 24/7, to do the same, (well, SMB/AFP server with 4 hard disks attached) with no special heatsink whatsoever, without any problems.
I'm not trying to demerit the setup, just wondered if some certain heavier task could be mantained, like compiling sources for Arm architechture.
Kudos for the clever hardware design, and merry xmas!!!
Jorge AKA Laguna
Jorge, there's a huge difference between the earlier Pi's and the Pi 3. The former run fairly cool without a heat sink but for all-out stressing, the Pi 2 should have minimal heat sink. The Pi 3 is a very different beast with numerous reports of the SoC running very hot. This is why Jack went to the extreme of large copper "slabs" and his results are the best I've seen yet.
If you're not measuring the SoC temp, you should be. Heat shortens chip life to the tune of halving it for every 10C rise in temperature. The target max temp is 50C although this can be nearly impossible to achieve during all-out stressing without using forced air or water cooling.
How thick the copper pads are that you bought? I was wondering if I should get the thinner ones and just buy a bit more of them. Would 20 pcs of 15x15x1,0 mm pads be equivalent of 10 pcs 15x15x2,0 mm pads? Usually heat sinks have a lot of tiny gaps and not large chunks like your DIY-heatsink has, I presume you bought the 2,0 mm thick pads? :) And it seems there's 4 of them, so shouldn't the effect be similar if one buys just 10 pcs of the 15x15x1,0 mm pads and stacks 8 or 10 pads on top of the CPU. More cooling area, although the pads are slimmer per piece.
Actually, I can't remember, but probably the 2,0 mm. There's still lots of room for more tiles, but I don't need them. If I find them I'll get back to you.
Hey I'm just wondering how your Raspberry Pi got to 1.5GHz with no active cooling. I could not push mine pass 1.45GHz trying every configuration. I guess you got really lucky with the silicon lottery! Could you please show me the sysbench or hwbotprime if you have them? I would like to see how it performs compare to mine.
Thanks.
pi@Livingroom:~ $ sysbench --num-threads=4 --test=cpu run sysbench 0.4.12: multi-threaded system evaluation benchmark
Running the test with following options: Number of threads: 4
Doing CPU performance benchmark
Threads started! Done.
Maximum prime number checked in CPU test: 10000
Test execution summary: total time: 91.9462s total number of events: 10000 total time taken by event execution: 367.6919 per-request statistics: min: 36.44ms avg: 36.77ms max: 110.92ms approx. 95 percentile: 36.81ms
Threads fairness: events (avg/stddev): 2500.0000/9.57 execution time (avg/stddev): 91.9230/0.02
Your even luckier than me. Mine has power(voltage mostly) and heat problems under base speeds. i have to underclock mine to prevent an overcurrent trip and i find it wierd that my computer powersupply (rated for 22 amps on the 5v rail) has troubles maintaining the 5v for my pi.
There's another tester called "stress" (sudo apt-get install stress). Running the command "stress -c 4" reports somewhat higher temps than sysbench, probably because it's primary intent is to hog the cores. Across three Pi's, I noticed an average temp increase of approximately 4C over sysbench. I also found that the Pi3 hit my maximum 75C limit faster than with sysbench. I'm currently using a low-profile black-finned aluminum heat sink on the Pi3 and recently purchased a larger, thicker silver aluminum sink. It'll be interesting to see if the larger sink stops the temp rise before hitting 75C.
I like your inexpensive copper solution. Possibly an even better solution would be to use thinner copper strips and bend them up vertically to create more surface area and allow rising air to pass over these fins. You have the DAC card possibly limiting how high the fins could rise but standard Pi enclosures allow for a good 15mm of clearance above the Broadcom chip. As for the DDR ram, there's only a few mm of clearance on the bottom with the standard Pi enclosures. The horizontal strips are pretty much the only option there and I do agree that dissipating some heat from the DDR ram could allow for a faster DDR clock speed.
Interesting! I'm currently running stress. I'll give it an hour and give you the results. Having fins sounds like a good add on. Now it mainly just uses the mass of the copper shims. Although, having them staggered probably helps by having half of the area in free air. By the way, the machine has now an uptime of a couple of months, mainly because I had some updates and had to restart. But you need to have some luck with the specific Raspberry Pi 3 you get. Some are more robust than others.
So I run the stress test for an hour and the highest it ever reached was 62.8C. So I'm pretty happy! https://www.jackenhack.com/wp-content/uploads/2017/04/cpu-temperature.png
You're in considerably better shape than me Jack! I'm running 67C at idle and stress throttles me at 75C. I just found an even better stressing tool, cpuburn-a53. Here are the instructions for downloading and compiling:
wget https://raw.githubusercontent.com/ssvb/cpuburn-arm/master/cpuburn-a53.S gcc -o cpuburn-a53 cpuburn-a53.S
cpuburn-a53 appears to bypass the built-in throttling mechanism so you should refresh temps every 20 seconds or so. In your case, I don't think you have anything to worry about but my tests using the larger aluminum heat sink revealed that the sink is pretty much up to the manufacturer's claim of 75C max. I ended up with a peak temp of 78C with no throttling.
How much clearance do you have between the SoC and the DAC card?
What type of thermal plaster/glue did you use to attach the copper shims? Based on your results, I think I'm going to try this method to cool my Pi3.
Thanks!
I used CPU cooler paste and left a small area in the middle for standard superglue.
how was yours able to draw so little power? i can't even properly power mine with a one or two 2 amp tablet chargers or even a computer powersupply's 5v rail (rated to 22 amps). i must have gotten a dud card or the luck that my pc powersupply might be inconsistent with voltage.
if you are using an older ATX psu, then you will need to load the other outputs as well otherwise you will not see 5volts on the 5 volt output. try loading the 12 volt output with a car light bulp or similar high load. then you should see the 5v dc voltage stabilize at 5volts or slightly higher.
I have had similar issues in the past.
see this link that guy has found a solution (though he needed proper 12volt) https://brazenartifice.wordpress.com/2011/12/26/atx-power-supply-5v-load-resistor-for-better-12v-regulation/
I guess yours like mine. I have no way to run the Pi 3 at 5V without power issues (oc to 1.35GHz maximum). So I bought a voltage regulator and step down a 12v adapter to ~6.3V. My RPi 3 seems to happy with that. It draws 0.5A on idle running Kodi (LibreELEC) and 1.3A on 4 threads of dd fulload() command plus Kodi plays 1080p video. You could try with that, but remember to get a fan for your Pi.
I guess yours like mine. I have no way to run the Pi 3 at 5V without power issues (oc to 1.35GHz maximum). So I bought a voltage regulator and step down a 12v adapter to ~6.3V. My RPi 3 seems to happy with that. It draws 0.5A on idle running Kodi (LibreELEC) and 1.3A on 4 threads of dd fulload() command plus Kodi plays 1080p video. You could try with that, but remember to get a fan for your Pi.
Here the image: https://i.imgur.com/K8g62QY.jpg
Seems like you got extremely lucky. My RPi3 freezes every 10-20 seconds when i run it off a 1.5A power adapter. It even fails to boot Windows IoT at all! (probably the boot process is more demanding than Raspbian) And with 2A it runs smooth.