Warning: as of yet, there is no official support for overclocking the Raspberry Pi 3, so you could damage your small computer. Just a reminder.
The new version of Raspberry Pi 3 was released yesterday, so I naturally had to get two. I’m using two as Stratum-1 NTP servers, and with the old Raspberry Pi 2, I had hit the roof when it came down to getting better time resolution. So when I read that a new 50% faster version had been released, I raced to the nearest store and got a couple. I have one experimental NTP server that isn’t handing out time on the internet and another one that is the primary server, connected to the NTP Pool Project.
I installed the experimental Raspberry Pi 3 first, so I could test performance and try to overclock it. And it went very well.
Overclocking
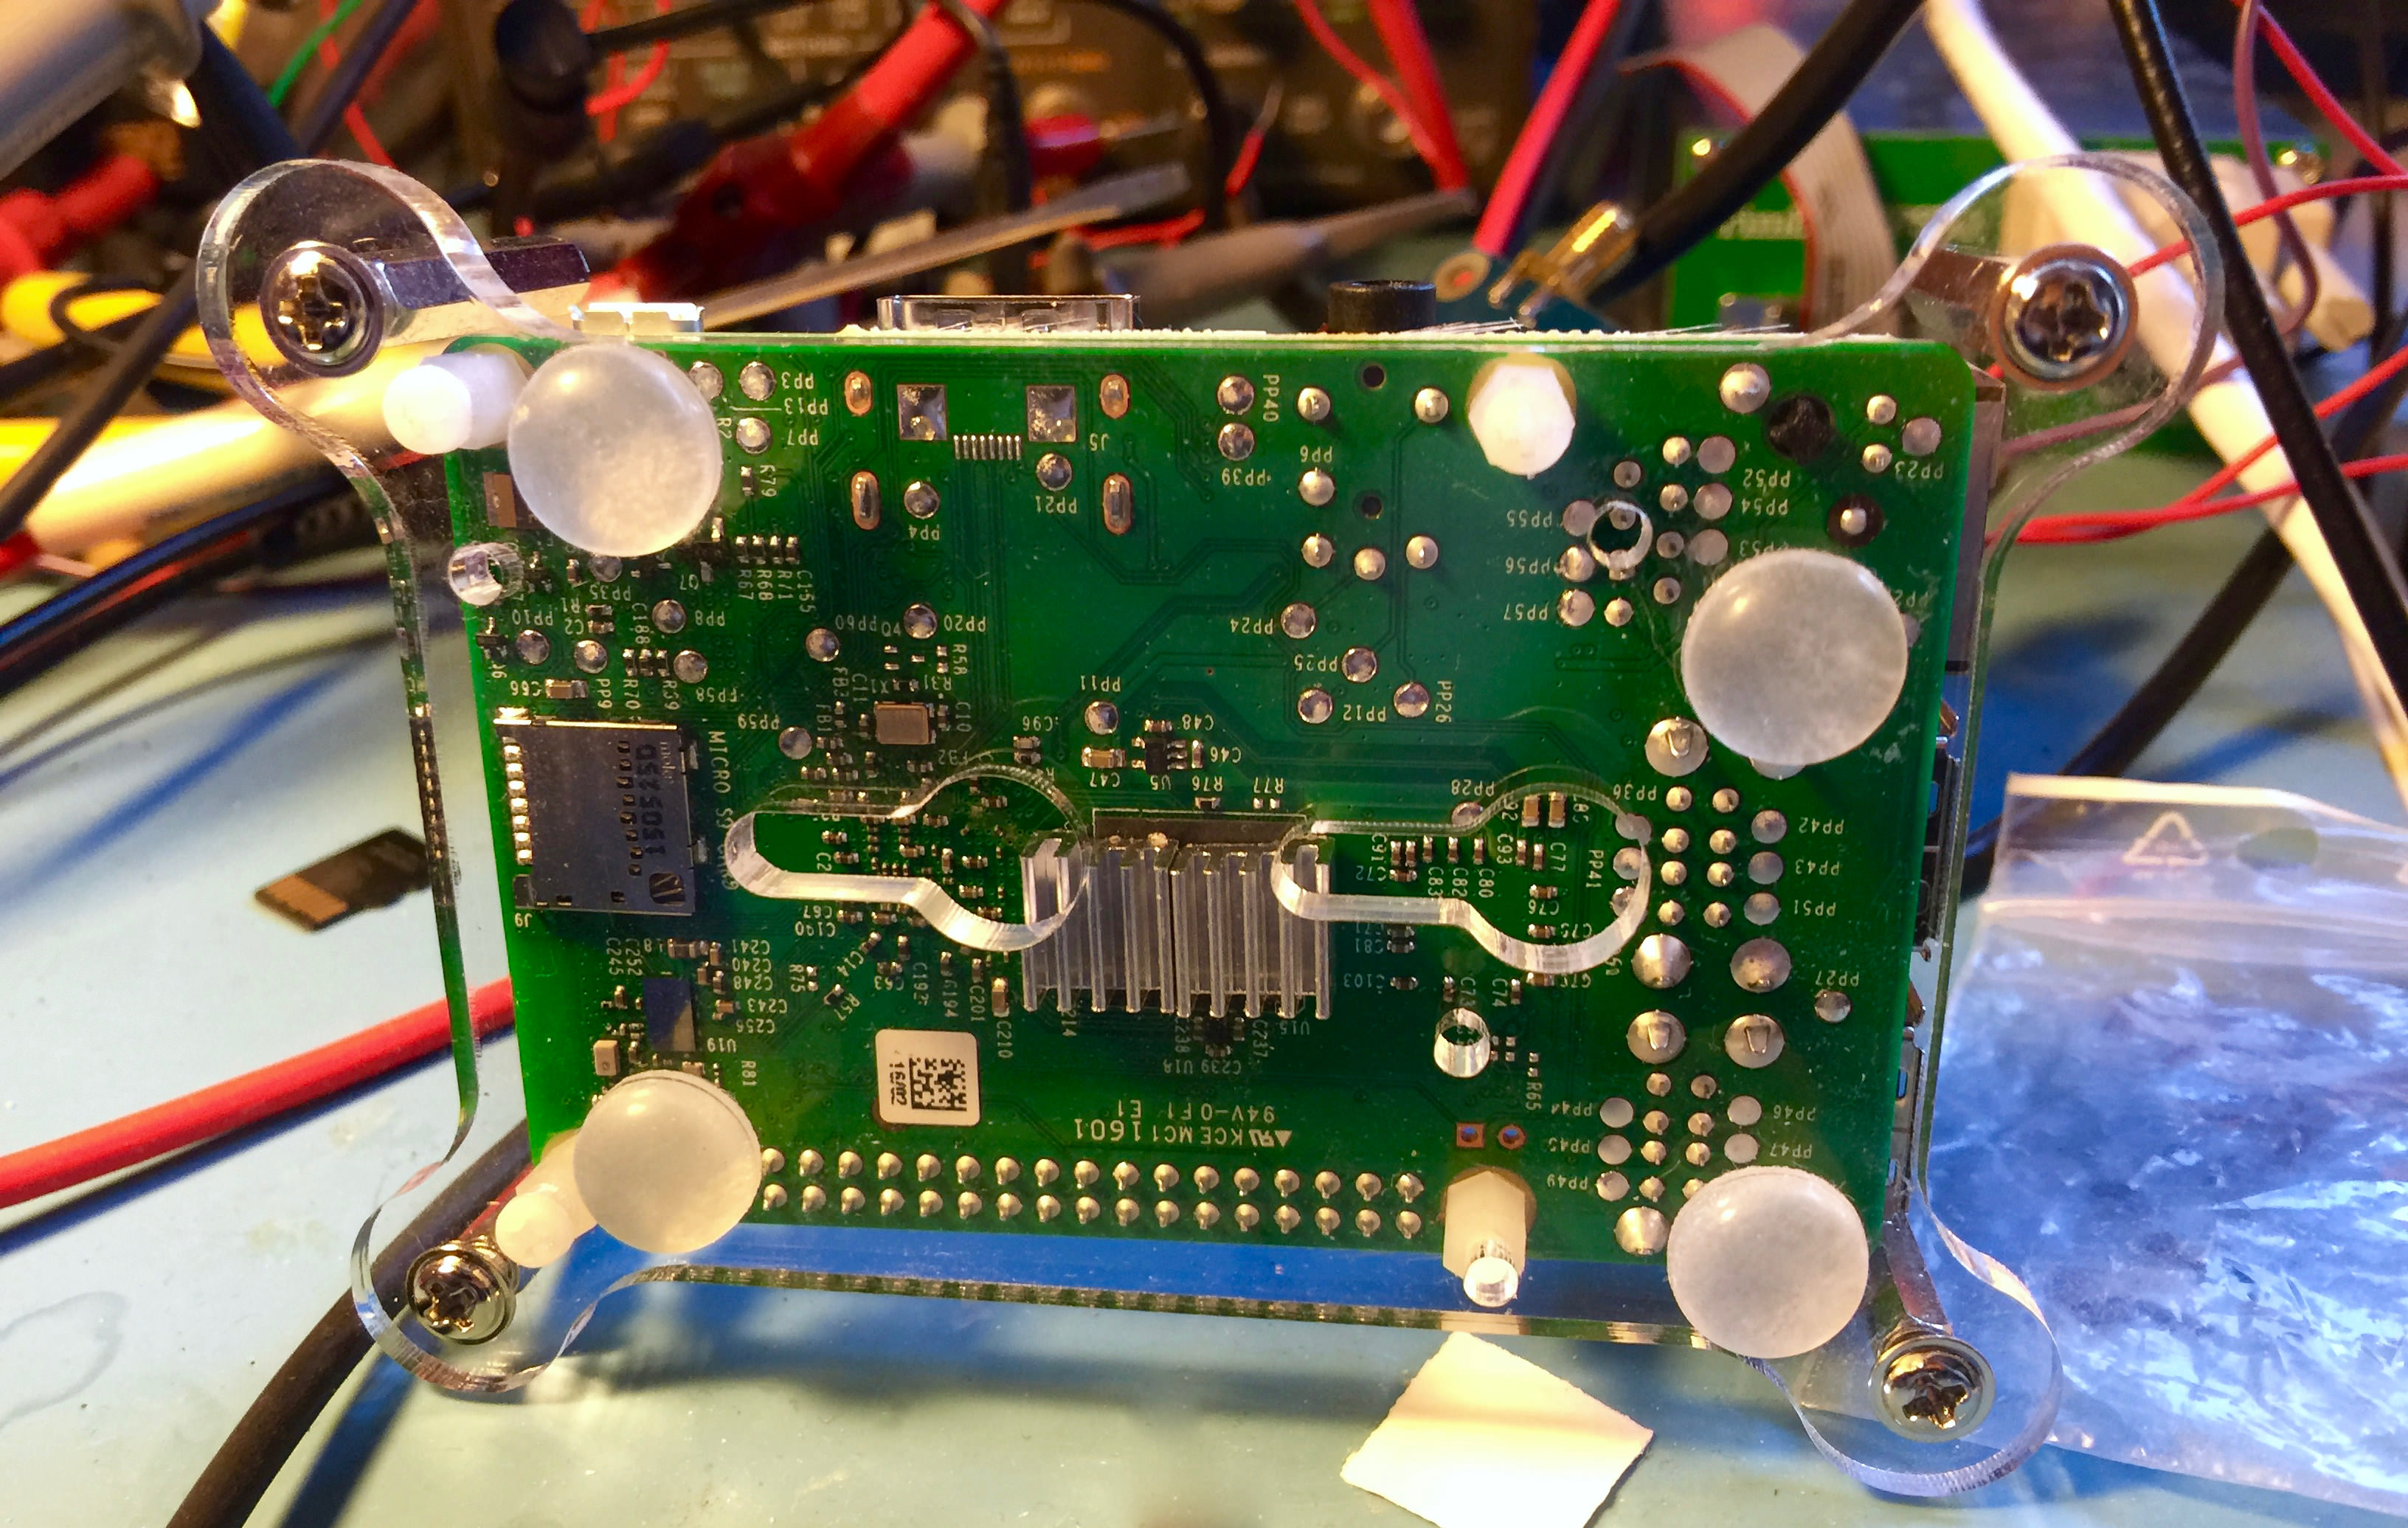
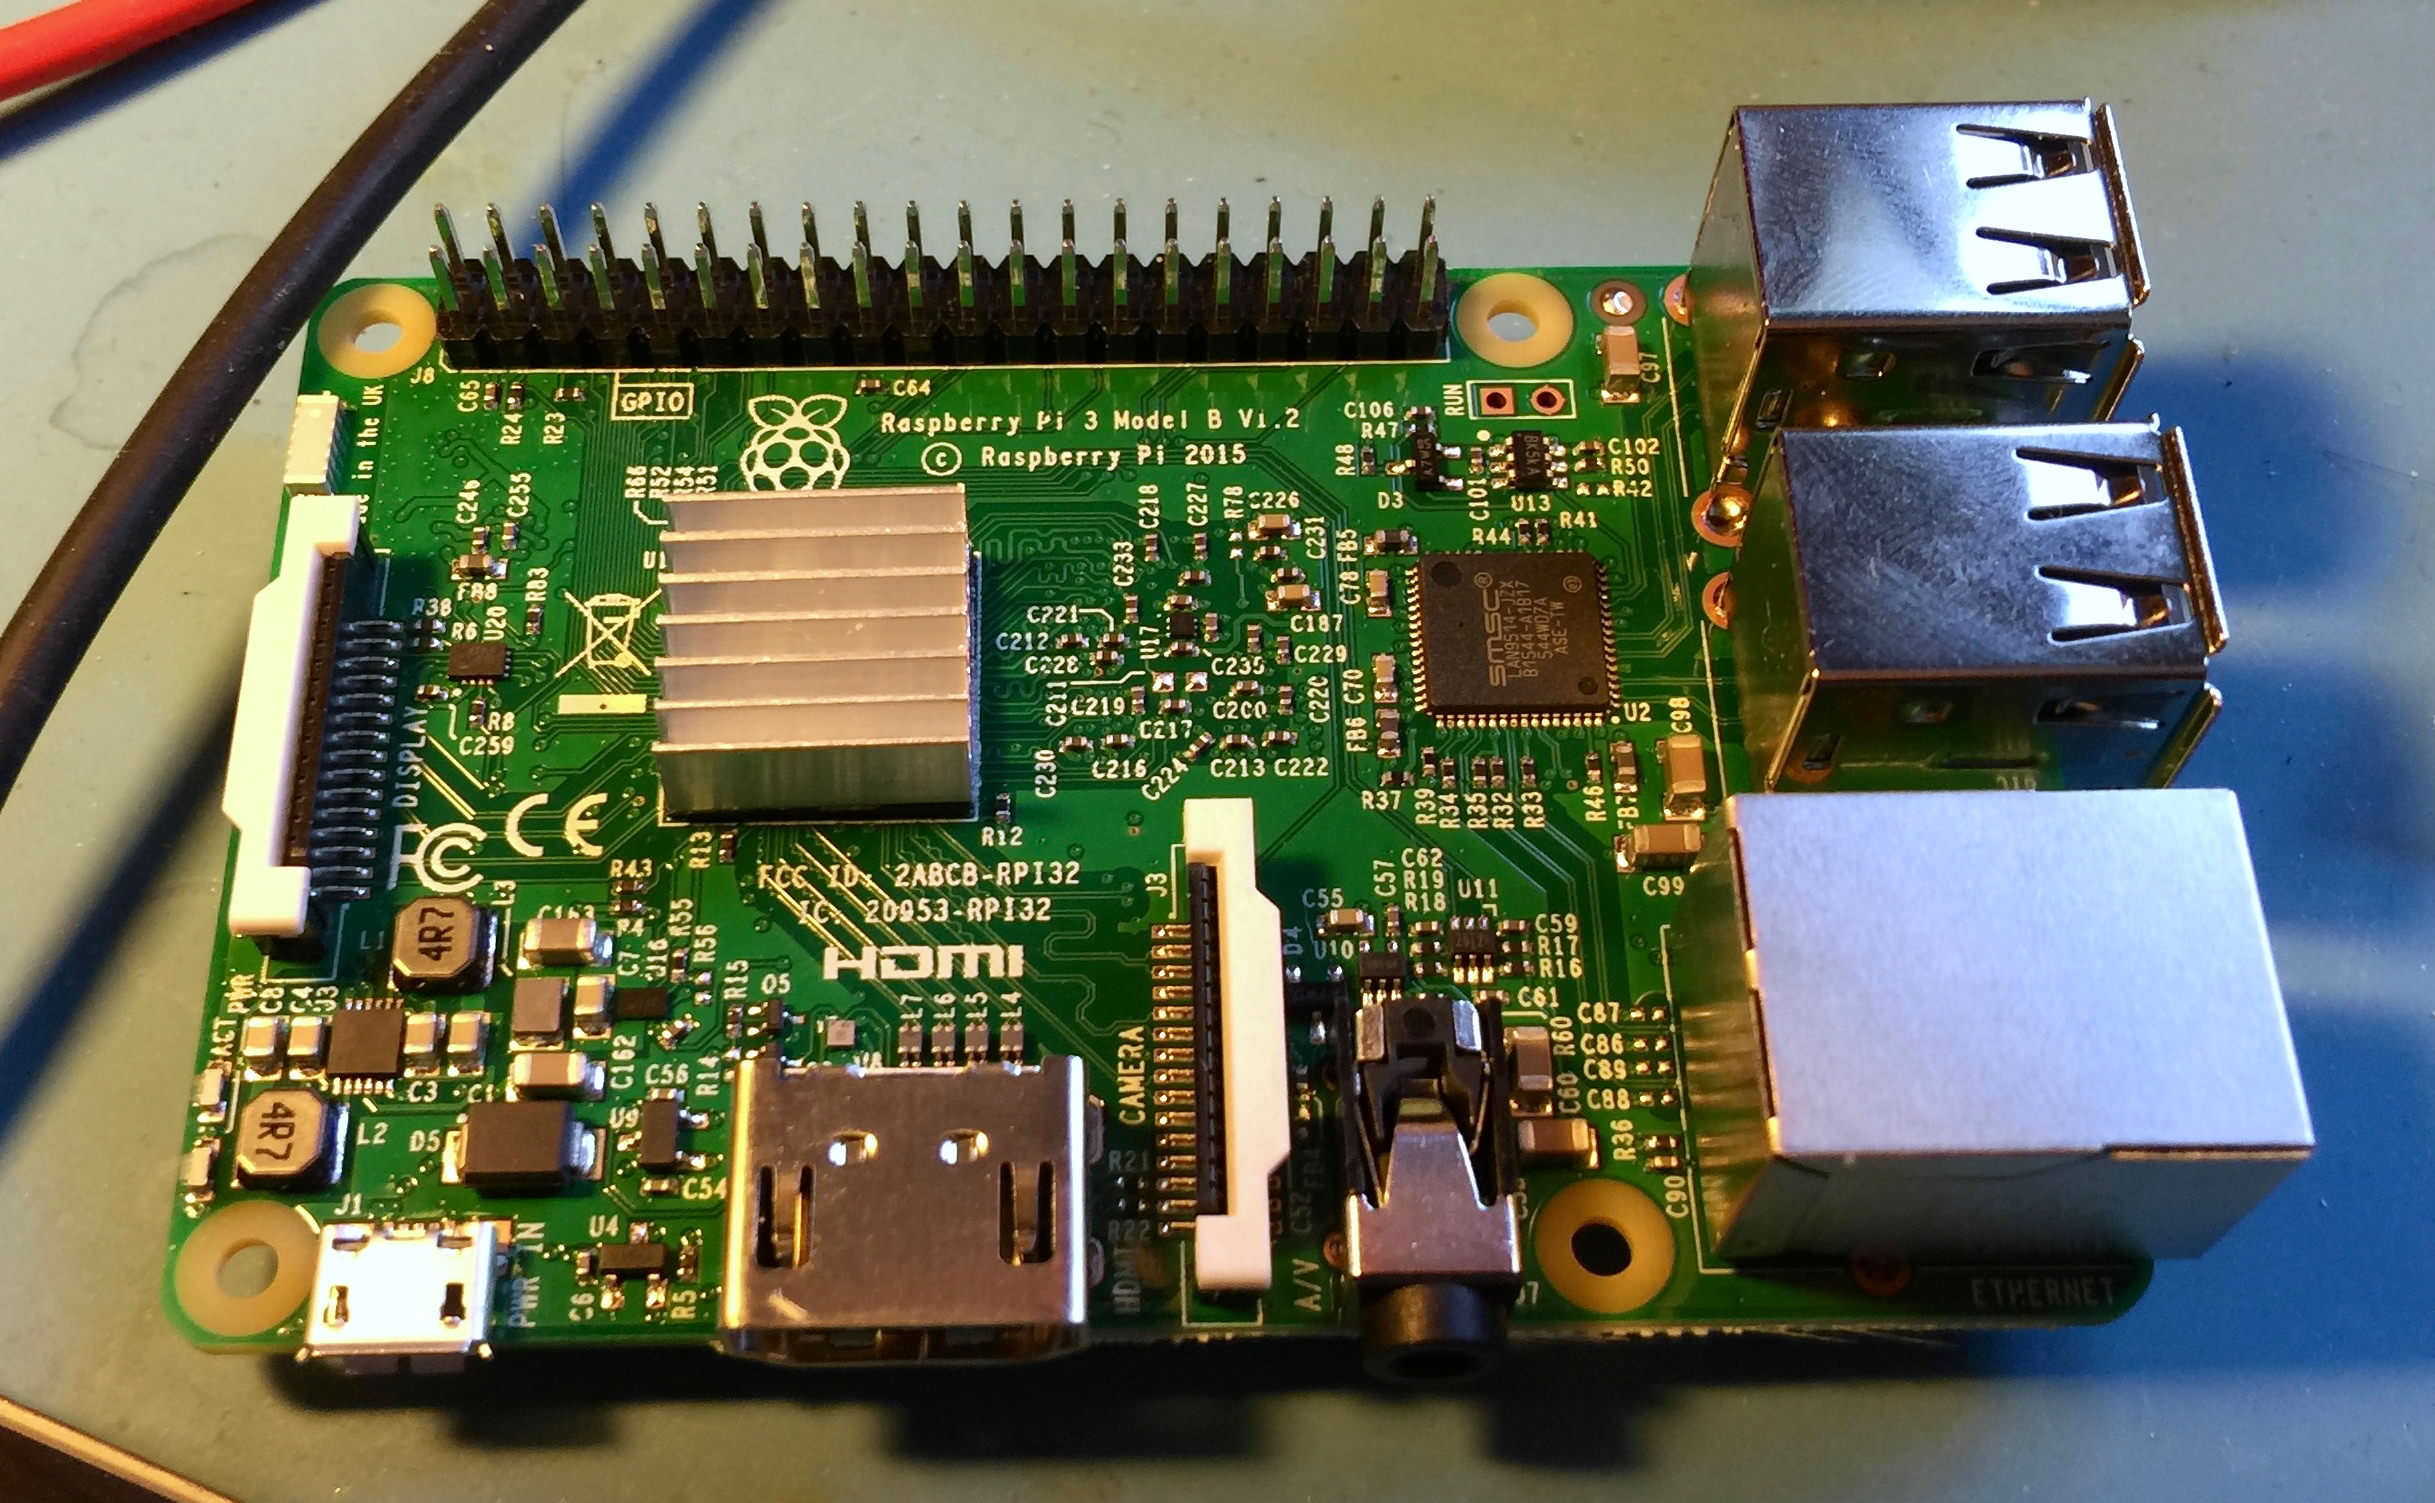 Naturally, I want to get the most out of the Raspberry Pi 3, so I got some small heat sinks. There’s one larger for the CPU/GPU, so that was easy enough. But then it got confusing. What to do with the other two smaller heatsinks included in the “overclock kit” for the Raspberry Pi. The immediate instinct is to put it on the other large IC, but after searching for SMSC LAN9514 I realized it was the controller for Ethernet and USB and had a hard time trying to understand why the Internet was full of pictures of people putting a heatsink on a network/USB controller. I wanted to overclock the processor and memory. The memory chip is on the underside of the board, so I decided to put both of the smaller heatsinks on the SDRAM instead. Seems to me to be a better place to put a heatsink. But It comes with a problem. Space. Most enclosures for the Raspberry Pi doesn’t have enough room for heatsinks on the bottom side of the card. Fortunately, my board uses spacers, so I could use longer standoffs and fit the board correctly, even putting a wee bit of pressure on the heatsinks to help with the cooling.
Overclock Testing
Time to fire the new Raspberry Pi 3 up and try to get the max performance out of it. I booted it with the already installed Linux Raspian, and all worked as normal, just…you know, faster. Time to test. First I put the CPU cores in “Performance” mode so they wouldn’t go down to a slower speed. A Raspberry Pi have different CPU modes like conservative, on demand, userspace, power save and performance. When the processor has a light load, it goes into power saving mode, that switches to a lower CPU speed. So I put all the CPU cores in performance mode by writing the following command line.
echo "performance" |sudo tee /sys/devices/system/cpu/cpu0/cpufreq/scaling_governor
I wrote a small shell script to monitor the CPU speed and the temperature to be able to see if it gets too hot during my experiments.
I created a file called check_cpu_speed_temp.sh
pico check_cpu_speed_temp.sh
and wrote:
cat /sys/devices/system/cpu/cpu0/cpufreq/scaling_cur_freq
/opt/vc/bin/vcgencmd measure_temp
Now it was time to try how much I could overclock it. I opened the config.txt file in the /boot/ directory and changed the arm_freq setting to:arm_freq=1400I rebooted and everything looked good. So to test if the Raspberry Pi 3 would be stable under heavy load I wrote this on the command line, just to get the cores working at 100% CPU usage:fulload() { dd if=/dev/zero of=/dev/null | dd if=/dev/zero of=/dev/null | dd if=/dev/zero of=/dev/null | dd if=/dev/zero of=/dev/null & }; fulload
This just creates four threads that copy zeros into /dev/null, the Linux equivalent of a digital trashcan. This puts all four cores at close to 100% all the time.
I started the small shell script, having it update every two seconds by writing:watch ./check_cpu_speed_temp.sh
And watched as the temperature climbed. It stopped around 58-59 °C and stayed there. The next step, going up to 1.45 GHz didn’t work, the machine refused to boot. So I put the SD-card in my Macbook Pro and edited the /boot/config.txt, adding voltage boost by adding the line:
arm_freq=1400
over_voltage=6
Now the machine booted up without a problem. I managed to run the Raspberry Pi 3 at 1.5 GHz but decided not to overdo it. I compromised and settled on a CPU frequency of 1.45 GHz.
If you want to kill the processes that bog down the CPU, just write killall dd and they will stop.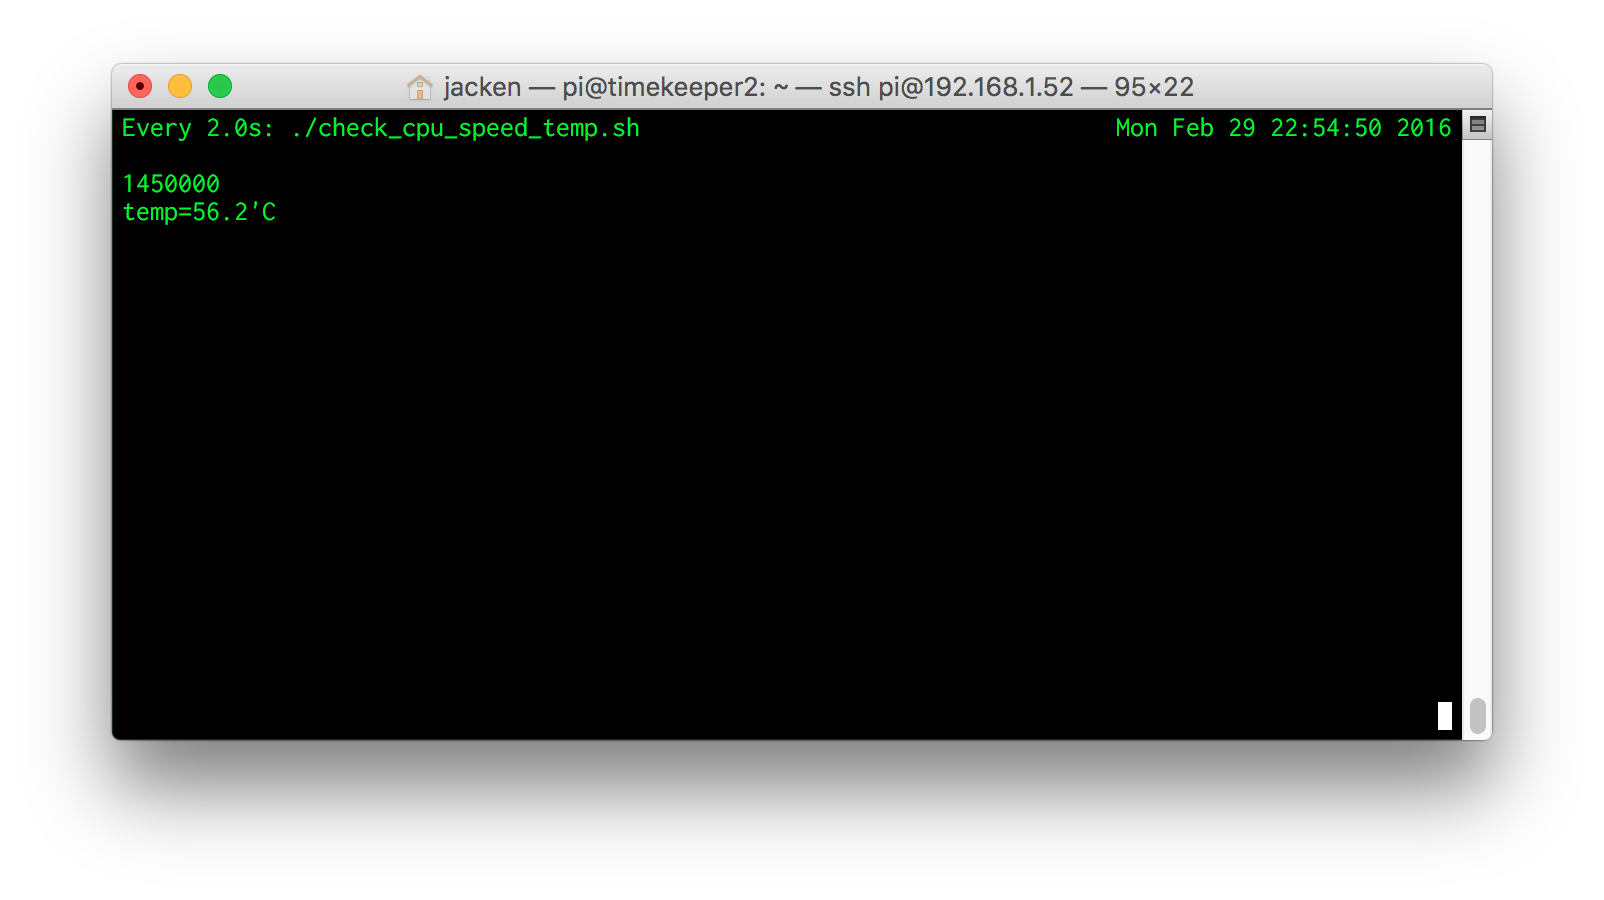
Memory Overclocking
Next step, overclock the memory speed. It seems like the new Raspberry Pi 3 has the same SDRAM memory as the Raspberry Pi 2. The standard rate is 400 MHz. I tried to bump it up, but it maxed out at 500 MHz. So I added sdram_freq=500 in /boot/config.txt. It worked perfectly. Next up was 550, but then the machine got unstable, so I settled for 500.
Graphics
I haven’t tried to increase the speed of the GPU. My Raspberry Pi runs as a headless server, but I realize that the GPU speed is connected to the speed of the L2 cache, so maybe this is something to experiment with at a later time. Raspberry Pi 2 and newer have separate L2 Cache between CPU and GPU.
Running Your Raspberry Pi 3 at Full Speed All The Time
If you add the following two lines, your Raspberry Pi 3 will run at full speed all the time. Doing this will guarantee that you’re violating your warranty if something goes wrong. Just a warning.
force_turbo=1
Not all Raspberry Pi 3 are created equal
So I now had a Raspberry Pi 3 that run with 1000 MHz more combined processing power than the standard one and with a speed boost of the SDRAM. Naturally, I had to try it out on my other unit. No such luck. As soon as I tried to increase the CPU speed, it quickly climbed to over 80 °C and became unstable. So It seems like you have to cross your fingers when it comes to the possibility to overclock your Raspberry Pi 3. I quickly moved the faster card to my main server, because it is the one that needs the most speed.
Is the Raspberry Pi 3 faster?
I’m running the two Raspberry Pi as NTP-servers. Here’s a before-after plot of the time resolution on my Stratum-1 NTP-server loopback statistics.
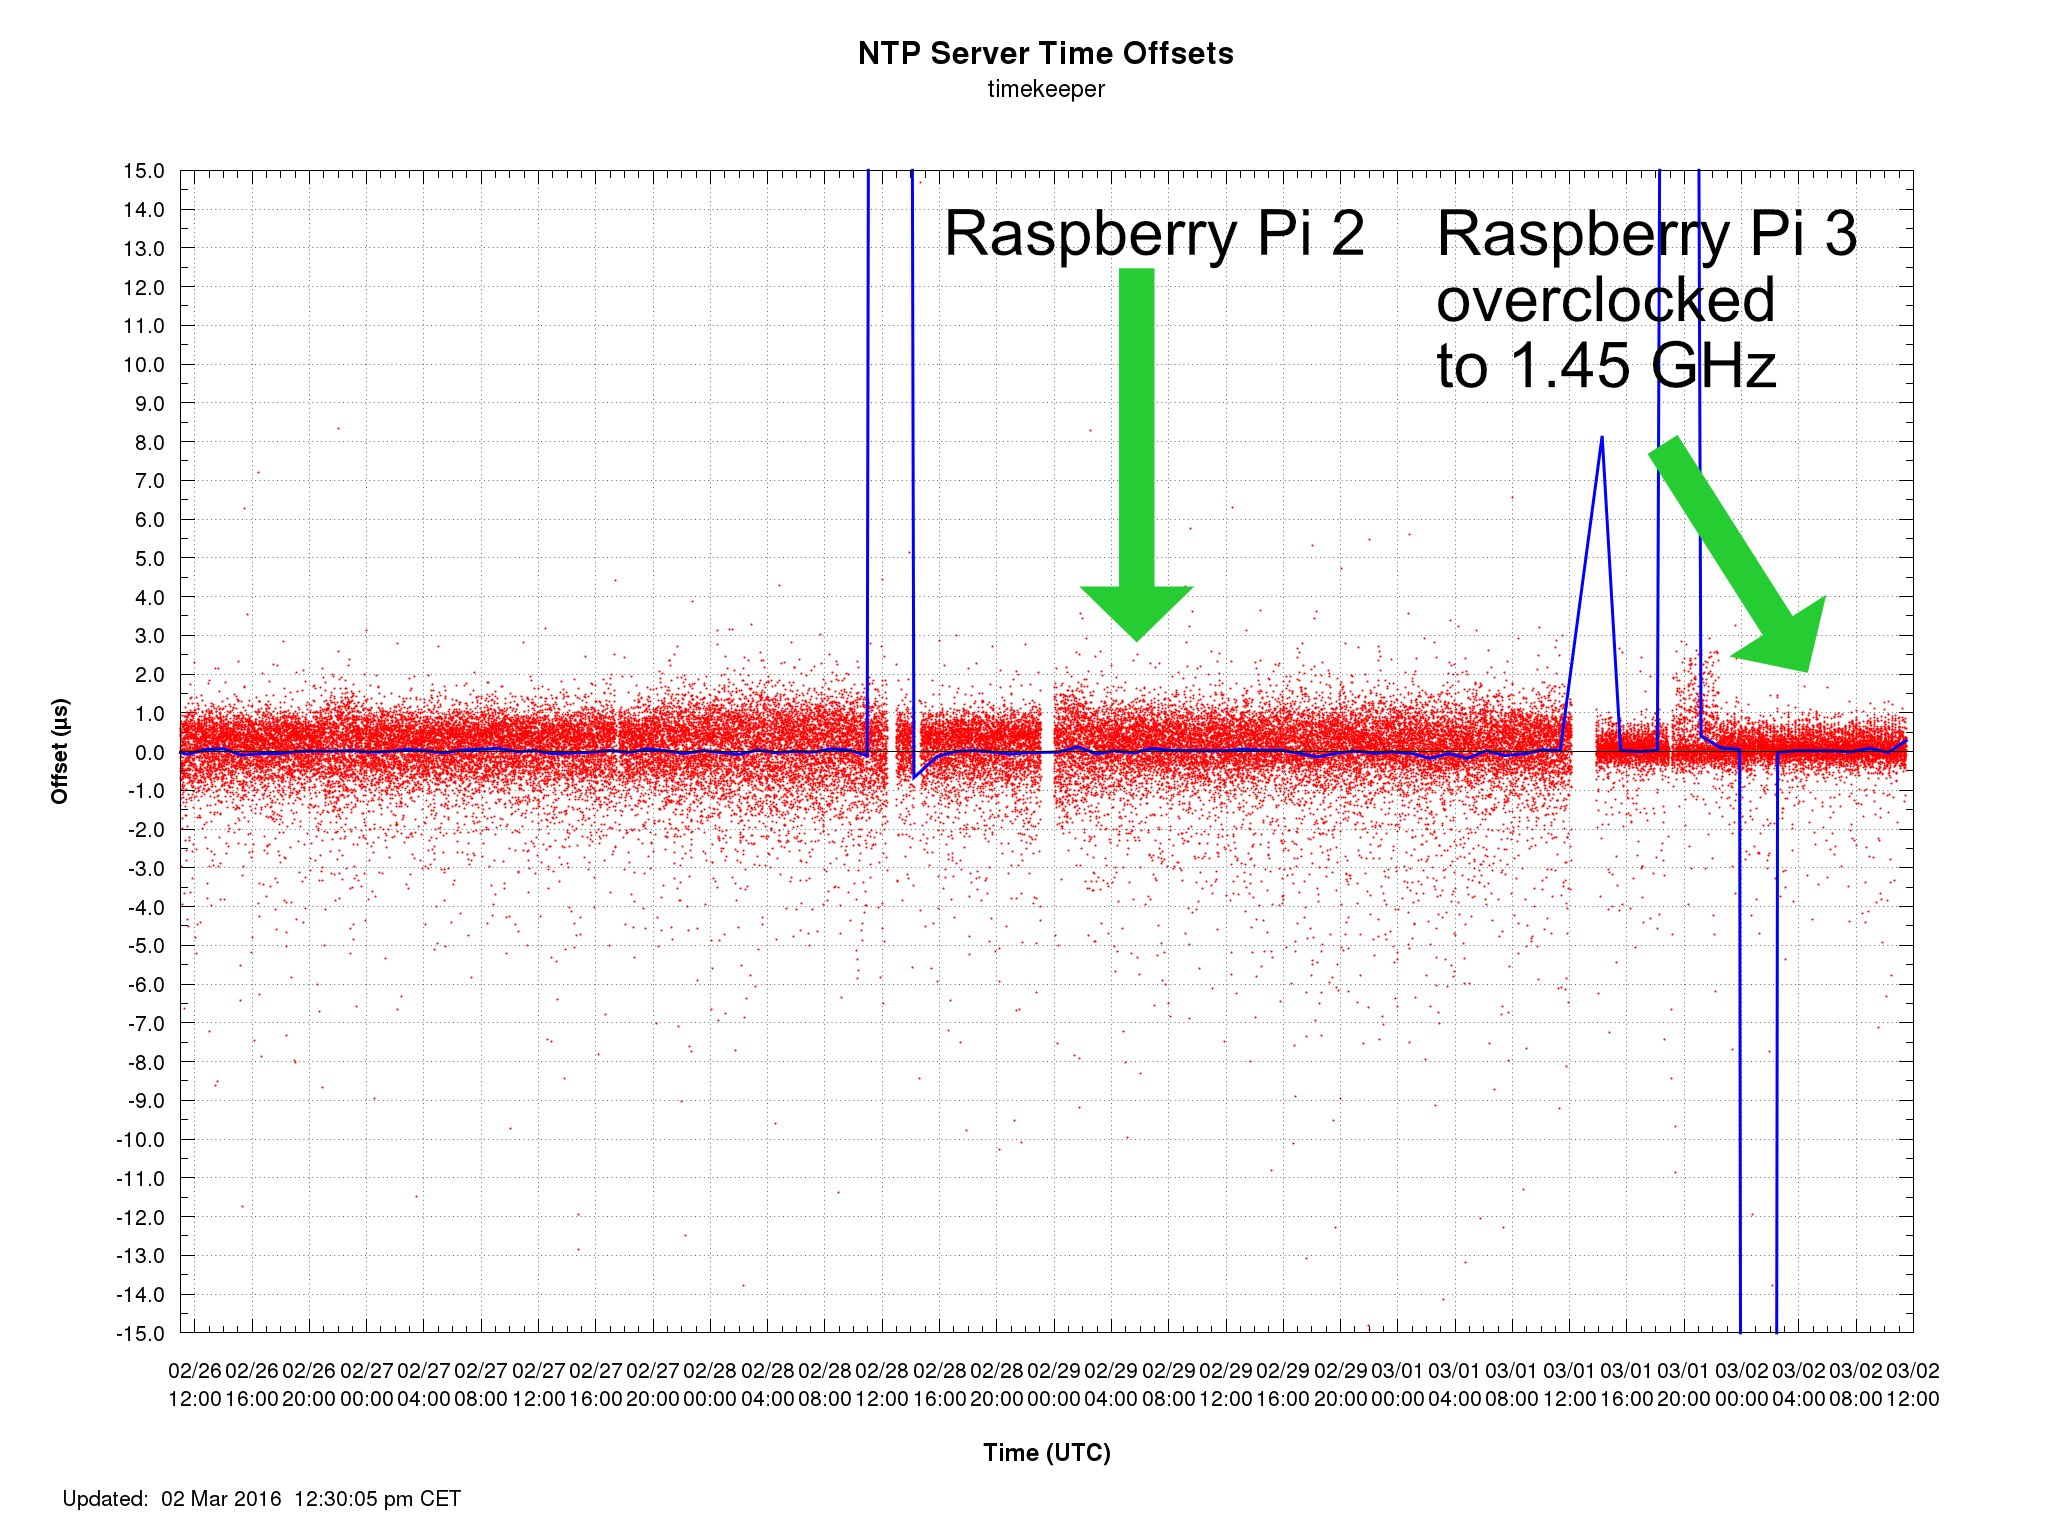
Nano Second Raspberry Pi 3 NTP Server
The servers precision has gone from 0.95367431640625 µS calculated precision to 0.476837158203125 µS. So I’m now in the nanoSecond territory on my Stratum-1 NTP-server. Unfortunately, the Raspberry Pi’s Ethernet goes through USB at 100Mbit/sec, so that’s a bottleneck.
The overclocked Raspberry Pi 3 has now been running for 24 hours, handing out time to thousands of computers and it is stable as a rock. Update 2016-03-16: Still running one of the Raspberry Pi 3’s at 1350 MHz and 500 MHz memory settings and it’s rock solid.
So it seems like it’s a crap shoot if you’re going to be able to overclock your Raspberry Pi 3. I got lucky with one of the cards. And let’s face it, a 1.2 Quad Core 64-bit computer for $40 is fantastic!
Benchmarking the Overclocked Raspberry Pi 3
After comments about the overclocking not working, here are my results. The test program seems to be a single thread, but I can debunk the idea of the processor going slower when overclocking.
Standard Raspberry Pi 3 – no overclocking
BYTEmark* Native Mode Benchmark ver. 2 (10/95)
Index-split by Andrew D. Balsa (11/97)
Linux/Unix* port by Uwe F. Mayer (12/96,11/97)

TEST                : Iterations/sec.  : Old Index   : New Index
                    :                  : Pentium 90* : AMD K6/233*
--------------------:------------------:-------------:------------
NUMERIC SORT        :          650.05  :      16.67  :       5.48
STRING SORT         :          66.218  :      29.59  :       4.58
BITFIELD            :      1.8311e+08  :      31.41  :       6.56
FP EMULATION        :          124.03  :      59.52  :      13.73
FOURIER             :          6531.7  :       7.43  :       4.17
ASSIGNMENT          :          8.6217  :      32.81  :       8.51
IDEA                :          1858.7  :      28.43  :       8.44
HUFFMAN             :          896.88  :      24.87  :       7.94
NEURAL NET          :          9.7445  :      15.65  :       6.58
LU DECOMPOSITION    :          314.82  :      16.31  :      11.78
==========================ORIGINAL BYTEMARK RESULTS==========================
INTEGER INDEX       : 29.905
FLOATING-POINT INDEX: 12.378
Baseline (MSDOS*)   : Pentium* 90, 256 KB L2-cache, Watcom* compiler 10.0
==============================LINUX DATA BELOW===============================
CPU                 : 4 CPU ARMv7 Processor rev 4 (v7l)
L2 Cache            :
OS                  : Linux 4.1.17-v7-atom-pps+
C compiler          : gcc version 4.9.2 (Raspbian 4.9.2-10)
libc                : libc-2.19.so
MEMORY INDEX        : 6.347
INTEGER INDEX       : 8.426
FLOATING-POINT INDEX: 6.865
Baseline (LINUX)    : AMD K6/233*, 512 KB L2-cache, gcc 2.7.2.3, libc-5.4.38
* Trademarks are property of their respective holder.
Overclocked Raspberry Pi 3 to 1350 MHz CPU and 500 MHz SDRAM clock speed
BYTEmark* Native Mode Benchmark ver. 2 (10/95)
Index-split by Andrew D. Balsa (11/97)
Linux/Unix* port by Uwe F. Mayer (12/96,11/97)

TEST                : Iterations/sec.  : Old Index   : New Index
                    :                  : Pentium 90* : AMD K6/233*
--------------------:------------------:-------------:------------
NUMERIC SORT        :          685.76  :      17.59  :       5.78
STRING SORT         :          68.556  :      30.63  :       4.74
BITFIELD            :      1.9658e+08  :      33.72  :       7.04
FP EMULATION        :          129.07  :      61.93  :      14.29
FOURIER             :          6460.8  :       7.35  :       4.13
ASSIGNMENT          :          10.302  :      39.20  :      10.17
IDEA                :          1972.1  :      30.16  :       8.96
HUFFMAN             :          930.43  :      25.80  :       8.24
NEURAL NET          :          10.065  :      16.17  :       6.80
LU DECOMPOSITION    :          400.31  :      20.74  :      14.97
==========================ORIGINAL BYTEMARK RESULTS==========================
INTEGER INDEX       : 31.995
FLOATING-POINT INDEX: 13.506
Baseline (MSDOS*)   : Pentium* 90, 256 KB L2-cache, Watcom* compiler 10.0
==============================LINUX DATA BELOW===============================
CPU                 : 4 CPU ARMv7 Processor rev 4 (v7l)
L2 Cache            :
OS                  : Linux 4.1.17-v7-atom-pps+
C compiler          : gcc version 4.9.2 (Raspbian 4.9.2-10)
libc                : libc-2.19.so
MEMORY INDEX        : 6.977
INTEGER INDEX       : 8.834
FLOATING-POINT INDEX: 7.491
Baseline (LINUX)    : AMD K6/233*, 512 KB L2-cache, gcc 2.7.2.3, libc-5.4.38
* Trademarks are property of their respective holder.
GotNoTime says
It sounds like your Raspberry Pi heatsink kit was designed for the Raspberry Pi 1.
The SMSC USB hub+Ethernet chip used to get very hot because of a wiring mistake on the original RPi 1 which is why people started putting heatsinks on it. When designing the board, they misconnected the output of a 1.8V regulator built into the USB chip to the SoC + 1.8V linear regulator (RG1) on the board. If the USB chip regulator output was slightly higher due to normal variation than the board linear regulator then the SMSC chip would end up powering the SoC as well.
The remaining small heatsink was for 3.3V linear regulator (RG2) on the Raspberry Pi 1 board which has since been replaced with a far more efficient SMPS design.
No real reason to put a heatsink on the SMSC chip now though since a properly wired board has the SMSC chip running cool.
Jack Zimmermann says
That explains it. Thanks for the info! Now on to putting a ridiculously sized heatsink just for kicks…
James says
I used a dremel to custom cut and old Pentium heatsink to fit the Pi 2.
Looks awesome, but didn’t help overclocking too much. The top stable Mhz remained the same but at least got me some lower temps.
Jack Zimmermann says
Interesting! Just what I was thinking of doing. Ok, smaller heatsink but with a Pentium CPU fan next.
Herbert says
Hi,
in case, I have one heat sink left over, I would still use it for the USB+Ethernet chip.
When you have look at the thermography scans at https://www.flickr.com/photos/ultrapurple/25313223701/in/photostream/, you will still spot the warm USB+Ethernet chip.
Just my two cents.
Cheers,
/H.
Jack Zimmermann says
Well, you do on the Raspberry Pi 2, but version 3 looks ok to me.
albert says
You did see the temp scale only went to 40+ C not worth it to me. and if you look at other images where they push to 80+ C it does not light up.
James says
I’d like to know how much you could overclock the “bad overcloker” Pi 3 board before running into problems. The Pi 2 is known to go up to 1150Mhz… but the majority of the boards aren’t really stable after 1050/1000Mhz.
It would be nice to know what the “overclock baseline” with the Pi 3 would be.
Jack Zimmermann says
My thoughts as well. I’m currently working on modifying a lab reference distribution amplifier, but as soon as it is up and running I’m going to continue to explore how much the “bad” version of the boards can take.
Watch this space for further development…
🙂
James says
Well, just a follow up as I now have my own board for little while.
It seems that my board is stable at 1300 with heavy 4 core workloads and tops at 1350 with 2 core heavy workloads, even when using 6 overvolt.
Heat doesn’t seem to be the problem as the CPU hangs before even reaching 83 degrees. I used a big heatsink but I doubt using a bigger one or even a fan would improve my overclock results. Maybe with higher overvolt… but I don’t dare anything higher than 6 for now.
Herbert says
The heatsink on the chip for USB/ethernet makes definitly sense. Look at the thermography scans at https://www.flickr.com/photos/ultrapurple/25313223701/in/photostream/ (you have to scroll down a little bit).
You will see the heat dissipation on a RasPi2 and a RasPi3. Beside the heat on the MicroSD-card (surprising isn’t it?) there a two hotspots: the cpu and the USB/Ethernet controller.
Cheers
/H.
GotNoTime says
Why? The USB chip gets warm but not hot enough that it actually needs a heatsink. The chip is rated for far higher temperatures and it isnt throttling throughput due to temperature. You can put one on if you want but it doesn’t do anything useful apart from blinging out your Raspberry Pi.
imse says
Seems like you’re not alone in experiencing very different results with different units. I stumbled on this article where it seem like 3 people got very different temperature results while putting their Pi 3s under heavy load:
http://makezine.com/2016/03/02/raspberry-pi-3-not-halt-catch-fire/
Richard says
This is a great post. Thank you. I got utterly stuck when rasp-config said I couldn’t overclock my pi 3.
I’ve managed to get to 1.3ghz and 425mhz (cpu/ram) and be stable. 1.4ghz wouldn’t boot and 450mhz kept causing random lockups. Might be brave and try 1.35ghz on the CPU.
Wasn’t too keen to increase the voltage, but I bet that would’ve helped, as my temperatures were never a problem. So that’s my experience at least.
Jack Zimmermann says
I would go with 1.35 GHz and increase the voltage to 4 or 6. I’ve put my main server down to 1.35 GHz and 6 on over volt, just to be a bit conservative. But hey, if the “magic smoke” escapes, the board doesn’t cost a fortune.
Richard says
This pi will probably end up being battery powered, so upping the voltage is not desirable (hell, overclocking probably isn’t a good idea!) but thanks for the input, and this great blog post.
Kristjan says
I think its not overclockable at this time… You actually downclocked it. But I might be wrong.
In my testing when running stock I get 1903 in HWbot prime (java based), when I overclock the cpu to 1350mhz I get only 1445 points. But when I overclock the ram and gpu the score stays the same (or even lower at times)… So I guess none of the overclocks are actually working or they have a negative effect on the performance.
Jack Zimmermann says
Ehh, I just updated the page with some benchmark results. So, it works…
Kristjan says
I see. I upgraded my firmware and all the apps. Now I get 1350@stock and 1400@1.4Ghz . I guess java isn’t liking the overclock a lot or my raspberry pi is just weird (just like the first pi that I bought). Other benchmarks show better results now. I will keep trying I guess 😛
Jack Zimmermann says
I’m no math genius, but in this benchmark the overclocked machine gets a boost of around 20% in Integer performance.
James says
Interesting how all OC results are better, but FOURIER.
I wonder what could’ve caused this. Did you monitor the temperature during the tests?
Jack Zimmermann says
Maybe the results will be different when they come around and actually compiles the kernel for the ARM v8.
James says
Maybe the cpu frequency is being automatically down-throttled by the excessive heat? I guess that’s the only way your results would make sense.
Are you using a heatsink?
Kristjan says
Yes I’m using a heat sink. But today I noticed that the score went down to 1350 when @stock after I upgraded the firmware. Then I tried overclocking it and it didn’t really show any improvements… So maybe my Pie its just weird (just like my first RPI B).
Ivan Zhekov says
Higher voltages and CPU freqs drains more power from the Pi. If it is not enough, due to bad power supply you may experience negative effect.
Michael Murphy says
Does anyone know what the default gpu_mem= setting is on the raspi 3 is
and what a safe overclock would be?
Jack Zimmermann says
You can set the gpu_mem with sudo raspi-config. It only sets how much memory you allocate for the GPU. So If you’re only use your Raspberry Pi via the console, you can set it low but if you use the graphical interface, you set it higher.
Lorenzo Whitesell says
How to access config.txt file in boot/directory using terminal
Daniel Zilberleyb says
sudo nano /boot/config.txt
Tido says
Hi Jack,
Why didn’t you take
RPi – Monitor
The tool itself is very smart, little load to the ARM device, calculating & design is done in the Webbrowser of the client PC.
http://rpi-experiences.blogspot.ch/p/rpi-monitor-installation.html
Cheers
Tido
Jack Zimmermann says
Hi! Thanks for the tip on RPi-Monitor. I’m using my two Raspberry Pi 3’s as NTP-servers. I try to have as little software installed as possible on them because every little process affects the performance of the server timing. But this is good to know for other projects.
Thanks!
Jacken
Rez N. says
My Pi 3 at 1.3ghz with no over volt freezes when like launching Firefox and loading my Twitter timeline. It seems OK at 1.25.
(It seems to run at least at 1.3 with a bit of overvolt, not sure if it’s stable enough yet…)
Not too much luck for my Pi 3 i guess…
Rez N. says
Update on my Pi 3… i didn’t test a lot more with o/c, quickly bactracked. I looked at the temps without overclocking or anything else for a while, playing a 480p Youtube video in Firefox (on Ubuntu Mate), the temp quickly reaches 70°C and then quickly after that it reaches 80°C before the end of the 3 minutes trailer i was watching :/ Given the temp protection is at 85°C it doesn’t seem/feel great.
Sandy says
Is it possible to kill a RPi3 from overclocking/overvoltage?
I know Intels and AMDs will protect themselves by automatically lowering their frequency if they get too hot. Will the RPI do the same?
Sandy says
Also, where can I buy the heatsink kit?
Jack Zimmermann says
I actually think so. My second Raspberry Pi 3 is very flaky under heavy load, even when not overclocked. Thinking of buying a third just to try it out (you can never have too many Raspberry Pi’s)
You should be able to find small heatsinks on eBay.
PS: I added a warning at the beginning of the post for people to let them know they may void their warranty.
Bart says
Hi Sandy,
I never broke a Raspberry with OC experiments, mostly the poor quality of the switched power supply
where cause of breaking stuff or corrupting your SD card.
Invest in a good power supply with current control, because imho is the power supply the most important thing to watch in experiments.
kre says
Just FYI, upgrading to Debian Jessie and kernel 4.1 will make your test results some 10% better without any overclock. My stock RPi3 results:
BYTEmark* Native Mode Benchmark ver. 2 (10/95)
Index-split by Andrew D. Balsa (11/97)
Linux/Unix* port by Uwe F. Mayer (12/96,11/97)
TEST : Iterations/sec. : Old Index : New Index
: : Pentium 90* : AMD K6/233*
——————–:——————:————-:————
NUMERIC SORT : 698.15 : 17.90 : 5.88
STRING SORT : 69.929 : 31.25 : 4.84
BITFIELD : 1.9972e+08 : 34.26 : 7.16
FP EMULATION : 131.22 : 62.97 : 14.53
FOURIER : 6564.5 : 7.47 : 4.19
^C
Niels says
Hi,
Great post Jack.
I have tried to oc my Pi3, as described to 1350 and 1400 and to no avail. It boots with any setting changed arm_freq, sdram_freq, core_freq etc.
Temp stays at ~50oC, all 4 cores run boinc at 100%
None of it changes the performance, the only benchmark I run is the boinc client Run Benchmark and I always get the same result 376 floating point MIPS and 1240 integer MIPS. This is even slower than my Pi2 oc at 1GHz which gets 498 floating point MIPS and 1898 integer MIPS.
I’m thinking that the oc is deliberately turned off in the raspbian version I run.
Any ideas?
Niels
francois says
Hello Niels,
I had the same trouble than you, I was ready to send back my four Rpi3 to the vendor, when i tried a bigger electicity source : 3A, and miracle my RPI3 has went 2 time speeder !!!
So be carefull don’t source your pi with an usb 2 pc port like me !!!!
Have a good trip !
RPI is great ! but how strange to moderate speed in function of current !!!
I hope i help you?
Kieran says
I have two Raspberry Pi 3 boards here, both can do 1400mhz but refuse to go any higher. Both tested with OpenELEC.
One of them has the heatsink on the CPU/GPU and the other is bare. I’m waiting for adhesive thermal pads.
I wondered what kind of mount/case Jack is using, and if any other cases have space underneath like that?
Hubba says
I can highly recommend to but a small mini fan on the SOC, it reduced the max temp by 20°C for me. Take the power from the GPIO.
Bart says
Hi Jack, the speed tweak u mentioned 1350 /+6 is exactly right.
Running os: Exton rasparch https://sourceforge.net/projects/rasparch/
All is what i expected, but i am really impressed by the sensitivity of the wifi (not the speed 🙂 ).
Cant wait to modify that as well if i get some pigtails 🙂
Ciao from Holland
Bart
Jan says
Just a note, you don’t have to do this for every cpu core:
for gov in /sys/devices/system/cpu/cpu[0-9]*/cpufreq/scaling_governor; do echo “performance” | sudo tee $gov >/dev/null; done
The file scaling_governor is the same for all cores. In fact the cpufreq subdirectories under cpu1, cpu2 and cpu3 are just symlinks to cpu0/cpufreq.
So all you really have to do is: echo “performance” |sudo tee /sys/devices/system/cpu/cpu0/cpufreq/scaling_governor
Jack Zimmermann says
Hi!
Great, didn’t know that. The wonders of the internet. You learn something every day.
Changed in the article.
Thanks
Jacken
Chris N says
Jack your script to put all 4 cores at 100% load is severely flawed. According to ‘top’, all cores are only at 30% load (I can get a higher load on all 4 cores simply by watching a youtube video in theatre mode, and a 720p mp4 in omxplayer).
See; http://s18.postimg.org/i1m98qbih/2016_03_26_121836_1680x1050_scrot.png
I suggest you put all 4 cores under full 100% load (instead of 4 cores at 30% load), and then see how stable your arm_freq overclock truly is.
Instead of this:
fulload() { dd if=/dev/zero of=/dev/null | dd if=/dev/zero of=/dev/null | dd if=/dev/zero of=/dev/null | dd if=/dev/zero of=/dev/null & }; fulload
Use this:
wget https://raw.githubusercontent.com/ssvb/cpuburn-arm/master/cpuburn-a53.S
gcc -o cpuburn-a53 cpuburn-a53.S
./cpuburn-a53
Jack Zimmermann says
Weird, because I used top to check hand get from 96-100% utilisation of the CPU cores. But if you have a better solution, run with it. I have statistics that plot a lot of data every hour, so all the cores are at 100% for six minutes every hour. At 1350 MHz it’s still running without a problem for three weeks.
Chris N says
Another good source to put a constant 100% load on the arm (8 threads) is “sysbench”.
In terminal 1 (then hit ‘1’ to see all individual cores):
top
In terminal 2:
sudo apt-get install sysbench
while true; do vcgencmd measure_clock arm; vcgencmd measure_temp; sleep 1; done& sysbench –num-threads=8 –test=cpu –cpu-max-prime=10000000000 run
source:
https://www.raspberrypi.org/forums/viewtopic.php?p=921165#p921165
Chris N says
These are the settings I am using on my Pi3 to fully optimize it:
# Uncomment to overclock ARMv8 (Cortex-A53) CPU (1200 MHz); DDR2-800 SDRAM (450 MHz);
# VideoCore IV GPU (300 GHz); double read/write performance of UHS-1/HC-1 SD Card;
# and set memory allocation of 1GB LPDDR2 SDRAM for VideoCore IV GPU
dtparam=sd_overclock=100
arm_freq=1300
core_freq=500
over_voltage=4
sdram_freq=575
sdram_schmoo=0x02000020
over_voltage_sdram_p=6
over_voltage_sdram_i=4
over_voltage_sdram_c=4
v3d_freq=500
h264_freq=333
gpu_mem=256
Mukesh says
Hi Chris,
Thanks for details info. What type of power supply do you use? Do you use heatsink with fan? Need heatsink on RAM chip?
Thanks
rive says
Official power supply from Element14 (5.25V 2.4A)
see: https://www.element14.com/community/videos/19460/l/ultimate-guide-for-raspberry-pi-3-performance-and-cooling
Demi says
When mentioning operating temperatures, could you, please, mention the ambient temperature, also. It is important to know this since not everyone is in Sweden or Canada 🙂 Thank you
J. Van Loock says
I am testing the temperatures, standard RPI 3 settings, full load and without head sink the temperature is 80,4 °C in house is the temperature about 20 °C. Temperature with head sink is 78,4 °C only 2 ° C lower, then I put on top of the head sink a bigger one 5 x 5 x 4 cm then the temperature go down to 68.8 ° C so 12 °C lower and the connection between the two head sinks is not optimal, because the two head sinks are on top of each.
Conclusion, you need a bigger head sink and the original is as good as useless, only 2° C difference. Second conclusion, I think that you can select the boards by measuring the temperature. A Board with a lower temperature on full load, will have also a lower temperature with overclocking and must be more stable.
suggestions, head sinks etc…
J. Van Loock says
My head sink on top of the original was not 5 x 5 x 4 but 4 x 3.5 x 3 temp is 68,4 °C .
J. Van Loock says
Normal temperature is 50 ° C internet surfen etc…
Demi says
This is good information. So the temperature rise, with a “beefy” heat sink is as much as 48-49 Celcius. One thing that would be, also, very valuable is the time it takes to reach a steady state temperature; i.e. did you run the test long enough for the temperature to stabilize for at least ten minutes and how long was the total run?
Thank you
J. Van Loock says
Hello, Demi
With a decent heat sink the temperature wil rise indeed about 50 ° C full load operation and no overclocking. The time delay is very short, more seconds, with an stabilization after five to ten minutes.
Without full load, internet and so on, the temperature is between 44 °C an 50 °C without the big heat sink.
With normal use without overclocking you don’t need an head sink at all, because the temperature wsil be between 44° C and 80 °C in case of full load.
I think with overclocking the temperature and full load the temperature will go over 100 ° C but mostly you don’t go for full load, so the temperature will stay lower, but I fond out that the temperature can go up in seconds, this mean that a short full load can heat up the chip en make it unstable.
In this case you need a big head sink, the small one is useless. With the small one te temperature drops only 2-3 °C.
From board to board there could be a difference, so therefore you can select the board’s by measuring the temperature in normal mode and choose those boards to overclock with the lowest normal full load working temperature.
Mow I am looking for a bigger head sink or an adaption, and some kind of heat conducting glue
J. Van Loock says
There is other thing, with a heat sink the rise of the temperature is slower due to the heat capacity of the heat sink itself. It works as a buffer, so even if a small heat sink will not cool enough, it will smooth the temperature changes. so it go from seconds up to one minute, and of course with a bigger head sink the changes are also more smooth than than with the smaller one.
willie says
sweet spot for me on my RPi3 is:
arm_freq=1350
over_voltage=5
very nice! i use a heatsink on the CPU…
i’m getting ready to stress-test a 3rd RPi with a heat sink and 5V fan next week…
willie ‘I love the smell of napalm in the morning’ on the Gulf of Mexico
chimpin says
This is my third Raspberry Pi 3. The three of them failed to pass sudo memtester 128M with config.txt untouched in latest raspbian installed from Noobs . Only when I force sdram to a 400 MHz the raspberry passes the test without failure. I’m desperate.
I use a pc fan that keeps temperatures under 45 ºC when running memtester. When I run a sysbench with 4 threads to force 100 % load the temperature never goes higher than 62ºC and consequently doesn’t throttle.
rive says
“…three of them failed to pass sudo memtester 128M with config.txt untouched in latest raspbian installed from Noobs”
You realize that isn’t how you are supposed to use Memtester? You are actually only testing 128 MB out of 1 GB, and you don’t run it as ‘sudu’ in any event.
Lower gpu memory to 64 ( ‘gpu_mem=64’), then test as much memory as you can for multiple passes:
memtester 700m 5
rive says
There is a new benchmark for the Pi 3 that will tell you if your overclock is stable (Linpack Bench). An unstable overclock, or improperly powered or cooled Pi 3 will perform poorly on the benchmark, or will outright fail it. The test takes approx 2 min to run or so.
A stock Pi 3 can pass the bench at 6 Gflops (Processor performance of 6 billion operations per second), a moderately overclocked Pi 3 (1275 MHz and with over_voltage=6), can pass the benchmark at 6.8 Gflops.
Video: https://youtu.be/KuEZV0WsRLg?t=18m43s
Install and run Linpack (be sure to reboot after install, and prior to benchmark run):
Install Linpack:
sudo apt-get install libmpich-dev
wget http://web.eece.maine.edu/~vweaver/junk/pi3_hpl.tar.gz
tar -xvzf pi3_hpl.tar.gz
chmod +x xhpl
Run Linpack:
./xhpl
serge says
Regarding the performance decrease after the overclocking. I did some tests and found out that an unstable overclock can cause the CPU to slow itself down (not thermal throttling) and will require a reboot. For example, when I overclocked to 1350/over_voltage=4, and ran the
“fulload() { dd if=/dev/zero of=/dev/null | dd if=/dev/zero of=/dev/null | dd if=/dev/zero of=/dev/null | dd if=/dev/zero of=/dev/null & }; fulload”
everything seemed to be fine. The highest temperature was 56c. Then I ran the above mentioned command AND Quake3 at the same time. At first, I noticed a dramatic increase of the CPU temperature (up to 65c) and the PI’s power consumption was ~7.5W at peak. After a couple of minutes I noticed that things got slower – the CPU temperature suddenly dropped to 55c and power consumption dropped to ~5.5W so I figured that something was wrong. I added some more juice with over_voltage=6 and it now seem to be totally stable with no performance drops.
The moral of this story: a thorough stability/performance testing is required or otherwise you may end up with a slower/unstable Pi.
Zach says
Really fantastic article and very helpful. I’m having an issue with the temperate shell script.
I wrote it out just as you have and placed is under ~/ — however, when I attempt to execute it (sudo watch ./check_cpu_speed_temp) I receive an error “Permission Denied”. Any idea what that could be from?
If I just run sudo /opt/vc/bin/vcgencmd measure_temp it works fine and shows ~ 48.3C @ arm_freq=1000 and if I run the arm_freq command I get back 1000. So, those seem to be working but the cat automation is no good.
Jack Zimmermann says
Have you tried chmod +x check_cpu_speed?
zach says
I figured that out after I posted. Feeling like a fool now 🙂
Now I’m trying to figure out how to get an AOC Usb monitor (16″) to work on this thing without having to repack and compile the Linux kernel. I don’t think it is possible. Any recommendations for a good monitor (doesn’t have ot be touch) that doesn’t have crap hanging out of it like everything on the market now? 10-13″ would be perfect.
Mitch says
Any idea why I get a permissions denied when running the watch ./check_cpu_speed_temp.sh command? I created it with the user I am logged in as so I have no idea why it would not allow.
Mitch says
I ran sudo chmod +x check_cpu_speed_temp.sh and that resolved it. THanks
Tracy says
Howdy – Yall!
I wanted to jump in and say I overclocked my RPi3 almost as soon as i got it. It runs great. I moved it to Raspian Pixel and found I had to look for a little help and you guys all seem to have no issues with the specs which are very close to mine. I changed it a little after reading your posts. I got lucky with this one. Im not sure about the one over there still in a package. But this one can take a load. I keep it at 1325, 500, 500, 5 or 6 vol. and it seems to perform excellent with this mixture of specs. And, temps stay well within an excellent range. Not over 62C under heavy loads. I think thats great.
Anyhow thanks for the information.
scooter800m says
so i got my pi back in march and started running into power issues because my 5V2A just won’t cut it, i played around with using more than one of the 3 ways to power a pi3 and using an extra amp through the usb backpower (probably just .5amps getting through) it runs better but i still can’t get my pi to run at full 4-core 100% load without it using more power than is available. i wonder if my board was one of the “really bad” boards. although a sad 200MHz underclock allows me to use the cpu at 4-cores 100% load. i just run 3 really heavy dual threaded python programs that i built and see if the pi crashes/turns off. if not than i am good
Sivert says
Im gonna try the same as you, but step it up another notch. i imagine that watercooling is much more compact in terms of space, additionally to being relatively easy to make. as of right now i don’t even have the pi3 but i do have the pi1. there are very small watercooling blocks from alphacool such as the MCX one. how ever i would need to order it. it would be a fun project and i do want to see if i could do the same thing but with a pi zero.
i would then use a hardcase to contain it etc.
Brendan says
Great article, thanks! I am looking to increase processing speed to see if I can improve my BOINC performance. Here’s what I did:
arm_freq=1380
core_freq=500
over_voltage=4
disable_splash=1
force_turbo=1
boot_delay=1
sdram_freq=500
It runs fine with just BOINC, but anytime I try to fire up another application (such as Chromium) the system freezes. Also, the visual CPU monitor rarely goes above 50%. Before this experiment, it typically ran at 100% (with BOINC running full throttle).
Interested to see if this bumps up my numbers/performance.
Jack Zimmermann says
I wonder if the 1380 frequency is the problem? I’m using 1350 without problems on on of my Pi’s.
pavan says
hi
i just want to supply power for other devices which uses 5v dc from the raspberry pi by cutting and soldering the wires and also i want to connect all the usb ports with mouse keybord wifi dongle and also i would like to connect my camera module to raspberry pi
here my doubt is the is too much load on raspberry pi will that effect my pi
Kyle says
Hello, i first want to say thank you for taking the time to write your article because I found it very helpful in learning about overclocking!
Second, I was wondering if you could tell me why I would not be able to execute the
watch ./check_cpu_speed_temp.sh
program that you advised writing? I am getting sh: 1: ./check_cpu_speed_temp.sh: Permission denied
I have created it, and even went back in to it with sudo nano to make sure that it is created but I cannot get the watch command to activate it. Any recommendations please?
Thank you.
Jack Zimmermann says
Just use
sudo ./check_cpu_speed_temp.shto execute it as root. You could also switch to root user by using the command:
sudo subefore you execute the script.
Dmitry says
Thanks for sharing this great stuff! I can say this tutorial is really valuable!)) I’ve also found a small supplement to your post – https://eltechs.com/overclock-raspberry-pi-3/ . In this post, several problems tending to occur while doing the overclocking are described. As well as the ways of avoiding them)) Hope this also may help!))
Jack Zimmermann says
Great stuff! I added the force_turbo=1 and boot_delay=1 in my article. Thanks!
Angel says
Hello, my Pi is unstable at 1400 even with overvolt=6, so I decided to push SDRAM harder,
these work stable for me:
dtparam=sd_overclock=80
arm_freq=1350
core_freq=500
gpu_freq=500
over_voltage=4
sdram_freq=600
sdram_schmoo=0x02000020
over_voltage_sdram_p=4
over_voltage_sdram_i=2
over_voltage_sdram_c=2
gpu_mem=80
I wonder whether running arm at 1200 while SDRAM is 1/2 of this would produce better results or async is not a problem. I did not notice so much speedup as result of this overclock except for sd card speed.
Josh says
Hmmm… I can get mine to 1400 and the settings I would up with run very nice – SDRAM has always been my struggle. I have mine set to (all else is default):
arm_freq=1400
gpu_freq=450
over_voltage=4
gpu_mem=256
I’ve tried manipulating SDRAM several times, all doing subtle adjustments each time – it’ll boot, but it just gets the desktop background up…(?)
Mirek says
Hi, when I edit config.txt and reboot i haven’t any effects, freq can.t changed … its still 1200. When opened first time file, freq was changed by 800 but freq in device was 1200. RPi 3 B china clone
GL says
Asking for a friend;
He said when he put in 3ghz (3000mhz) the commandline feedback was only 600mhz. Any idea why?
I know this is a pretty old post, but he cant find other sources, and other communities wont respond to him, he said.
urs says
with my RasPi4/8GB in an Argon-one and the fanspeed set to 48°C=20% the temp reaches 51°C
in normal use the fan switches very seldom on
thanks for that easy to use program